When Your Bill Skyrockets: A 15-Minute Spend Spike Response Playbook

Cloud cost spikes can drain your budget fast – anywhere from an 18% increase to doubling your monthly bill. If you’re a SaaS or AI team without a dedicated FinOps expert, quick action is critical. This 15-minute playbook helps you detect, investigate, and stop cost anomalies before they spiral out of control. Here’s the key takeaway:
- Detect spikes in minutes: Use real-time alerts and tools like AWS Cost Anomaly Detection or Google Cloud‘s anomaly features to catch issues early.
- Find the root cause: Break down costs by service, region, and resource to identify the driver – common culprits include misconfigured scaling, security breaches, or idle resources.
- Take immediate action: Terminate underused resources, pause non-essential workloads, and adjust scaling policies to curb costs within minutes.
- Document and prevent: Log the incident, analyze the root cause, and set up smarter alerts to avoid future issues.
Acting fast can save thousands of dollars and keep your cloud spend under control. Read on for a step-by-step guide to managing cloud cost spikes.
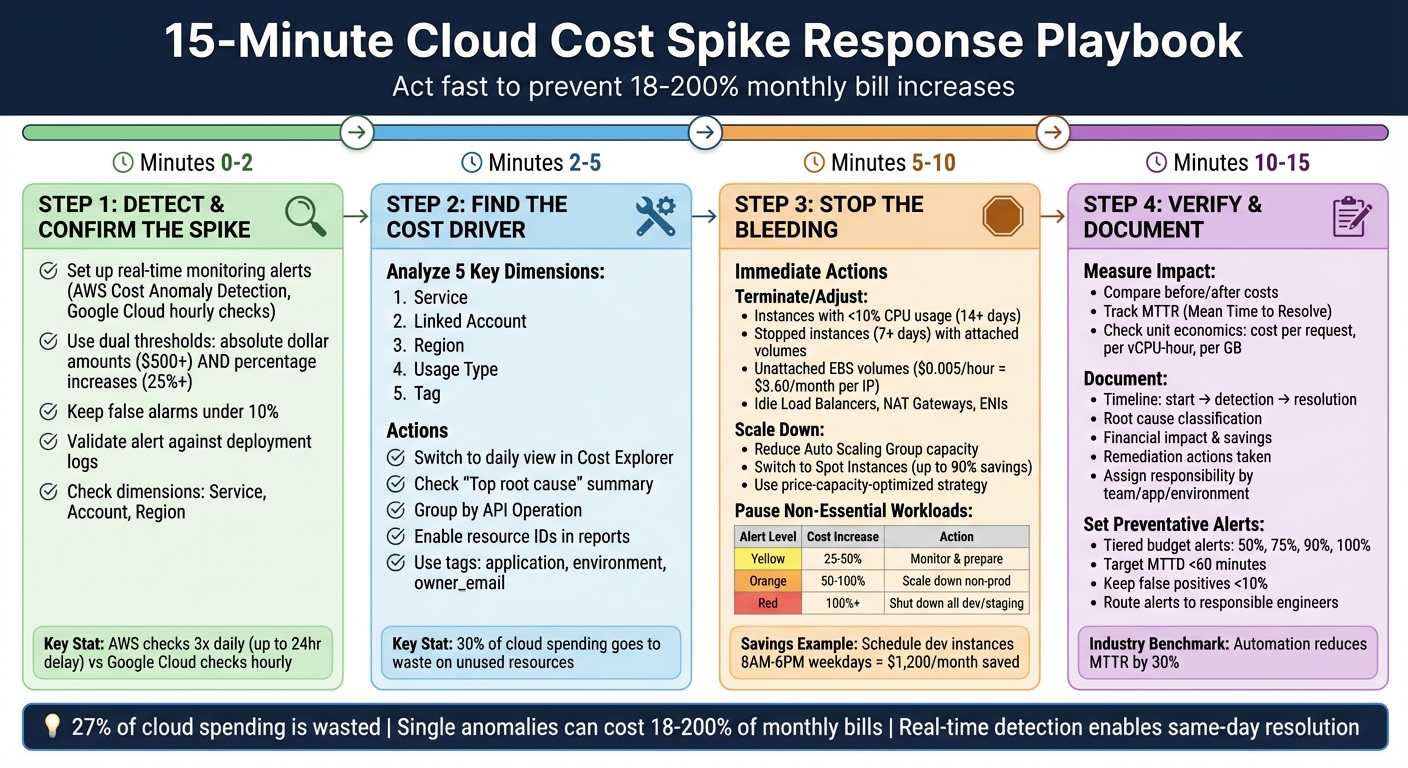
15-Minute Cloud Cost Spike Response Playbook: 4-Step Emergency Protocol
Step 1: Detect and Confirm the Spike (Minutes 0-2)
Set Up Real-Time Monitoring and Alerts
Spending spikes need to be caught immediately. Tools like AWS Cost Anomaly Detection use machine learning to flag unusual activity, but they only run three times daily, which can lead to delays of up to 24 hours. On the other hand, Google Cloud Anomaly Detection checks hourly at the SKU level, and Azure Cost Management highlights anomalies directly in the cost analysis view.
For faster responses, set up alerts with Amazon SNS instead of relying on daily summaries. To ensure you’re notified instantly, link SNS topics to communication platforms like Slack or Microsoft Teams using AWS Chatbot. Use dual thresholds for triggering alerts: absolute dollar amounts (e.g., notify if costs jump by $500) and percentage-based increases (e.g., if spending exceeds the baseline by 25%). This combination helps identify both major spikes and smaller, ongoing issues. To reduce unnecessary alerts, define suppression windows for predictable high-spend events, such as release nights or planned scale tests, keeping false alarms under 10%.
Once an alert is triggered, act quickly to confirm whether it reflects a real issue.
Confirm the Anomaly
After receiving an alert, spend about 60 seconds validating it to rule out false positives. Cross-check the alert against deployment logs to see if it aligns with recent activity, such as launching a new feature, running a load test, or closing out a billing cycle.
Classify the spike as either a new, removed, or changed cost. Check critical dimensions like Service, Account, and Region to pinpoint the resource responsible for the spike. If you’re using Azure, the "Smart Views" feature in Cost Analysis can provide a quick "Insights" summary. It will either confirm an anomaly or state "No anomalies detected" for the given dates. Adjust the "Group by" filter to focus on "Resource" or "Meter" to identify the exact asset causing the issue – like a VPN gateway being upgraded from VpnGw1 to VpnGw3. Once you’ve validated the spike, you’re ready to dive into the root cause in the next steps.
Cutting Cloud Costs with AI: Strategies to Reduce Your Spending
Step 2: Find the Cost Driver (Minutes 2-5)
After confirming the spike, the next step is to figure out what’s causing it. To do this, you’ll need to break costs down across some key dimensions.
Analyze Costs by 5 Key Dimensions
Once you’ve verified the spike is real, start dissecting your costs across five critical dimensions: service, linked account, region, usage type, and tag. Switch AWS Cost Explorer to a daily view to spot any temporary spikes. Focus on the service with the largest cost increase, then filter by usage type to zero in on what’s driving the spike – this could be things like data transfer, instance hours, or API calls.
For a quicker diagnosis, check the "Top root cause" summary in AWS Cost Anomaly Detection. This feature automatically highlights the service, account, region, and usage type responsible for the spike.
Use Cloud Cost Tools
AWS Cost Explorer is your go-to tool for analyzing hourly usage and resource-level data. To dig deeper, group CloudWatch results by "API Operation" to identify cost-driving calls like PutMetricData or GetMetricData. Look closely at the usage type string for clues – suffixes like GMD-Metrics suggest bulk API requests, while DataTransfer-Out points to egress costs.
Check out the "Detected Anomalies" tab to see a ranked list of anomalies, along with their cost impact and severity. For more details, head to the Anomaly Details page, where you can break down the spike by account, region, and usage type. If you’re still not sure what’s behind the spike, enable "Include resource IDs" in your detailed reports. This will help pinpoint the exact instance or bucket causing the issue.
Track Costs with Tags
Tagging is a powerful way to assign costs to specific teams or owners. At a bare minimum, make sure your tags include application, environment, and owner_email to ensure accountability. Configure AWS Cost Anomaly Detection to monitor key tags (like application-team) so alerts go directly to the responsible engineer instead of a general inbox.
"Owner-mapped alerts (app/team/env) mean the first ping reaches the responsible engineer, not a shared inbox." – Cloudaware
Use environment tags such as prod, staging, or dev to quickly differentiate between critical production spikes and less urgent workloads that can be paused. If your organization struggles with inconsistent tagging, FinOps platforms can step in. These tools use CMDB data to create "virtual tags", filling in gaps like owner_email or business_unit. Once the cost driver is identified and properly tagged, you’ll be ready to move on to Step 3 to address the issue directly.
Step 3: Stop the Bleeding (Minutes 5-10)
Time is critical – use these 5 minutes to immediately curb rising costs.
Adjust or Terminate Overprovisioned Resources
Start by pinpointing underutilized resources. Look for instances with CPU usage below 10% and minimal network activity over the past 14 days – these are prime candidates for termination. It’s worth noting that around 30% of cloud spending goes to waste on unused resources.
Pay attention to instances that have been stopped for more than 7 days. Even when inactive, attached EBS volumes, Elastic IPs, and provisioned IOPS can still rack up charges. Check for unattached EBS volumes in the "available" state and delete them after taking a final snapshot. Also, release any disassociated Elastic IP addresses, which can cost $0.005 per hour (about $3.60 per month per IP) even when idle.
Next, examine non-compute areas for waste. This includes idle Load Balancers with no active connections, unused NAT Gateways, and unattached Elastic Network Interfaces (ENIs). AWS Lambda scripts can help identify and shut down instances with CPU utilization under 10%. For Kubernetes users, consolidate pods onto fewer nodes to free up and terminate idle nodes.
Once you’ve addressed these inefficiencies, shift your focus to fine-tuning scaling policies.
Use Spot Instances and Auto-Scaling
To quickly control costs, reduce the Maximum and Desired capacities in your Auto Scaling Groups. If automated scaling policies are contributing to cost spikes, use the Suspend-Resume feature to pause scaling actions while you investigate.
For workloads that can handle interruptions – like batch jobs, CI/CD pipelines, or fault-tolerant applications – switch to Spot Instances. These can offer discounts of up to 90% compared to On-Demand pricing. Use the price-capacity-optimized strategy in your Auto Scaling Groups to automatically select the cheapest and most available Spot capacity pools. Maximize flexibility by choosing at least 10 instance types across all Availability Zones to ensure access to capacity when needed.
Enable Capacity Rebalancing in your Auto Scaling Groups to proactively replace Spot Instances likely to be interrupted, even before the standard 2-minute warning is issued. To minimize disruption, ensure your applications are stateless and use checkpoints to save progress.
While adjusting your compute resources, also evaluate workloads that can be paused to cut costs further.
Pause Non-Essential Workloads
Focus on non-production environments first, such as development, staging, QA, and sandbox projects. Research shows that 27% of cloud spending is wasted, with single cost anomalies potentially accounting for 18% to 200% of a monthly cloud bill.
Use resource tags like Environment, Team, or Project to quickly identify non-production workloads. If a workload isn’t critical to your operations, scale it down or stop it entirely. Suspend non-essential processes, including data integration tasks, BigQuery jobs, and other operations that aren’t immediately necessary. Additionally, halt cross-region replication and data transfer activities unless they are urgent.
Here’s a quick guide for non-essential workload suspension based on cost increase:
| Alert Level | Cost Increase | Recommended Action for Non-Essential Workloads |
|---|---|---|
| Yellow | 25–50% | Monitor closely; prepare to scale down non-critical assets |
| Orange | 50–100% | Take action; scale down non-production environments |
| Red | 100%+ | Emergency protocol; shut down all non-essential/dev environments immediately |
If the cost spike occurred after a recent deployment, consider rolling back to the last stable configuration. You can also save money by scheduling development and staging instances to run only during business hours (8 AM–6 PM weekdays). For a typical startup, this could save $1,200 per month. As Cloudaware highlights:
"Near-real-time detection turns unplanned spend into same-day owner action, which reduces the overrun tail and stabilizes monthly reviews".
sbb-itb-f9e5962
Step 4: Verify Impact and Document (Minutes 10-15)
You’ve taken steps to address the issue – now it’s time to confirm that your actions were effective and document the entire process for future reference.
Measure Before-and-After Metrics
Start by comparing the costs before and after your remediation efforts. Look at anomaly costs versus post-remediation costs to calculate savings from actions like rightsizing resources or terminating idle ones.
Keep an eye on your MTTR (Mean Time to Resolve), which measures the time from detecting the issue to fully resolving it, including rollbacks and scaling adjustments. Industry data shows that targeted routing and automation can reduce both MTTR and MTTA (Mean Time to Acknowledge) by about 30%.
Next, confirm that spending has returned to normal levels by analyzing hourly billing exports with resource IDs. Don’t forget to check your unit economics – metrics like cost per request, cost per vCPU-hour, or cost per GB stored – to ensure your efficiency has genuinely improved.
Document What Happened and What You Did
Create a detailed incident report that outlines the timeline of events: when the anomaly started, when it was detected, and when it was resolved. Conduct a root cause analysis to pinpoint the exact driver of the cost spike. Was it runaway auto-scaling? A security issue like crypto-mining? Or perhaps a deployment error? Classify the cause accordingly.
Document the financial impact by breaking down the total cost of the anomaly, the actual cost (difference between the spike and acceptable spending), and the projected cost savings from your timely intervention. Be sure to log all remediation actions and assign responsibility by linking the incident to the relevant application, environment, and team.
Here’s a real-world example: In July 2024, Palo Alto Networks faced a significant cost spike in Google Cloud BigQuery due to a configuration error in a new region. This error led to high usage that defaulted to costly on-demand pricing, as no reservation had been set up. Kuntal Patel, the FinOps team lead, resolved the issue by securing 100 baseline slots with a 3-year commitment and enabling autoscaling. A blameless post-mortem was then created, documenting the timeline, actions taken, and the cost savings achieved.
Set Up Preventative Alerts
To avoid similar issues in the future, implement layered alert systems. Combine budget alerts (which notify you when you approach spending limits) with machine learning–based anomaly detection that can spot unusual spikes even if they’re within the budget.
Set tiered budget alerts at 50%, 75%, 90%, and 100% of your expected monthly spend to catch potential overspending early. For production environments, configure individual alerts to notify stakeholders immediately when anomalies occur. Aiming for a Mean Time to Detect (MTTD) of under 60 minutes and keeping false positives below 10% are good benchmarks for a mature FinOps practice.
Use tools like Slack, Jira, or ServiceNow to route alerts directly to the responsible engineer or team, incorporating CMDB metadata. To reduce alert fatigue, set up suppression rules for known high-spend periods, such as load tests or major releases.
"Cloud cost anomaly detection is a nonstop, laser-focused guard for your bill".
Build Cost Optimization into Your Daily Workflow
Once you’ve tackled immediate cost spikes, the next step is weaving long-term cost management into your daily processes. Think of cost optimization as a habit, just like running code reviews or performing security checks. By making it part of your routine, you can prevent unexpected expenses before they arise.
Use Infrastructure as Code for Cost Efficiency
Tools like Terraform and AWS CloudFormation allow you to define cloud resources in version-controlled files, making it easier to enforce cost-efficient setups. Storing these configurations in Git ensures they’re reviewed and aligned with your cost-saving goals.
To take it further, implement Policy-as-Code solutions to automatically enforce cost-related rules. For instance, tools like Open Policy Agent (OPA) can prevent costly mistakes, such as deploying expensive GPU instances in development environments or creating resources without essential tags like owner, project, or cost-center. Proper tagging is critical because, without accurate data, tracking and optimizing costs becomes nearly impossible.
The impact of these practices is significant – companies have saved millions just by fine-tuning their infrastructure.
Add Cost Checks to CI/CD Pipelines
Your CI/CD pipeline can be a powerful tool for catching unnecessary expenses before they hit production. By integrating cost checks into your deployment process, you can identify and flag overprovisioned resources early. This "shift-left" strategy treats cloud costs with the same importance as performance or security.
Automated checks can block deployments that violate cost policies. For example, you could configure your pipeline to fail a pull request if it introduces over $50/month in new expenses, provisions untagged resources, or deploys high-cost instance types in non-production environments. Real-world results back this up: in August 2025, Choice Hotels achieved 98% cost allocation accuracy within two weeks and cut anomaly investigation times by 90% by enforcing such policies.
Simple changes can also lead to immediate savings. For example, switching from gp2 to gp3 EBS volumes can reduce storage costs by 20% for most workloads. Similarly, automating the shutdown of non-production resources after hours can slash compute costs by up to 65%. However, automation alone isn’t enough – it must be paired with a mindset that prioritizes cost awareness across the team.
Build a Cost-Conscious Team Culture
No amount of technology will fix cost issues if your team isn’t mindful of spending. As of 2025, Wise uses CloudZero to engage over 250 engineers in monitoring costs. By tracking transaction costs over time, they can differentiate between healthy growth and unnecessary waste.
A simple way to start is by incorporating cost data into your daily stand-ups. Tools like AWS Cost Explorer or QuickSight can make this data accessible and actionable for everyone. Sharing cost insights helps engineers understand the financial impact of their decisions and recognize efforts to reduce waste.
"Every engineering decision is a buying decision." – Phil Pergola, CEO, CloudZero
The numbers are striking: about 27% of cloud spending is estimated to be wasted, and 90% of companies admit they can’t trace at least 10% of their cloud costs to the correct source. Building a cost-conscious culture means treating every deployment, storage choice, and instance type selection as a financial decision – not just a technical one.
Tools and Services for Cost Management
Managing costs effectively requires the right tools at every stage, from spotting anomalies to taking corrective action. These tools are designed to help you act quickly, catching unexpected spending spikes in minutes.
Monitoring and Alerting
Keeping tabs on costs in real time is crucial, and several tools make this easier. AWS Cost Anomaly Detection uses machine learning to track spending patterns and automatically flags unusual activity. It can identify up to 10 contributing factors for each spike, ranked by dollar impact across dimensions like service, account, region, and usage type. However, it requires at least 10 days of historical data to start detecting anomalies for a new service.
For those using multiple cloud providers, Datadog Cloud Cost Management offers real-time monitoring across AWS, Azure, and GCP. It integrates with tools like Slack, Jira, and PagerDuty to ensure alerts reach the right teams promptly. Datadog starts at $15 per host/month for the Infrastructure Pro tier, with anomaly detection typically included in enterprise plans. Meanwhile, Google Cloud Cost Anomaly Detection operates hourly without requiring configuration and tracks anomalies at the SKU level, offering a more detailed view than many native tools. Azure Cost Management, on the other hand, highlights spikes directly within its cost analysis view, eliminating the need for additional setup.
Cost Analysis and Optimization
Once you’ve identified a spending spike, tools like AWS Cost Explorer and AWS Athena help pinpoint the root cause. Cost Explorer works alongside AWS Compute Optimizer and Trusted Advisor to provide actionable recommendations for rightsizing resources, often reducing compute costs by 20% to 40%.
For a unified view across cloud providers, third-party platforms like Cloudaware are invaluable. They normalize billing data from AWS CUR, Azure exports, and GCP BigQuery into a single format, enabling cross-cloud cost comparisons and business-unit grouping. Pricing starts around $480 per month for 100 servers. Another option, Harness CCM, offers a "Free Forever" plan for organizations spending less than $250,000 annually on cloud services, complete with anomaly detection features.
Automation and Infrastructure Management
Automation can take cost management to the next level. Terraform helps enforce cost guardrails by version-controlling monitors and ensuring consistent deployment across environments. AWS Lambda enables automated remediation by running custom scripts triggered by services like SNS or EventBridge. Similarly, AWS Auto Scaling lets you adjust scaling thresholds or reduce maximum instance counts programmatically.
Platforms like Amazon EventBridge integrate seamlessly with automation workflows, routing Cost Anomaly Detection events to Lambda functions for real-time action. These automated solutions can double savings on compute costs compared to manual interventions, ensuring cost control remains efficient and effective.
Conclusion: Turn Spikes into Learning Opportunities
Every unexpected cost spike can teach you something valuable about your cloud operations. While the playbook helps you manage emergencies, the real progress comes from what you do afterward. Conduct a thorough post-incident review for every anomaly. Document details like the affected service, severity, and scope. Over time, this builds a library of insights that helps you identify patterns and address similar issues more quickly in the future.
Use these incidents to fine-tune your systems. Take what you learn and apply it to your anomaly dashboards, adjust alert thresholds to keep false positives under 10%, and implement lasting fixes such as rightsizing resources or introducing automated governance policies. Real-world examples show the impact of this approach: Upstart cut $20 million in cloud costs through engineering-driven optimizations, while Drift saved $2.4 million by leveraging real-time cost intelligence. These steps set the foundation for the proactive cost management strategies discussed earlier.
"Every engineering decision is a cost decision." – Ben Johnson, CTO, Obsidian Security
The most effective teams move away from reactive problem-solving and focus on proactive cost management. Instead of only tracking overall expenses, start monitoring unit economics – such as cost per feature, cost per customer, or cost per request. This shift provides better insights into your business context, helping you differentiate between necessary growth and avoidable waste.
The ultimate goal is to create a culture where cost optimization is part of everyday operations, not just something addressed during crises. Assign specific owners to alerts using CMDB data, embed cost checks into your CI/CD pipeline, and establish governance guardrails to prevent waste from creeping back in. By treating cost as a priority alongside performance and security, you’ll reduce the frequency of those 15-minute emergencies and resolve them faster when they do occur.
FAQs
How can I quickly detect and confirm a sudden increase in cloud costs?
To spot and confirm a sudden jump in cloud costs, begin by checking alerts from monitoring tools like AWS Cost Anomaly Detection or Datadog. These tools rely on machine learning to highlight spending patterns that deviate from the norm.
Once alerted, dig into your billing data and usage trends to track down the root cause. Common culprits include unexpected workload surges, misconfigured resources, or processes running out of control.
Speed is key – compare these anomalies with recent changes in your environment, such as deployments or scaling updates. This method helps you quickly identify the problem, minimize its impact, and regain control over your costs.
How can I quickly identify the cause of unexpected cloud cost spikes?
To figure out the cause of unexpected cloud cost spikes, start by diving into detailed billing exports like AWS Cost and Usage Reports (CUR), Azure Cost Management data, or GCP Billing exports. These reports can help you spot patterns or outliers in your spending, making it easier to trace the source of the increase. Tools designed for anomaly detection are especially useful here, as they can flag unusual usage and pinpoint the specific services, resources, or accounts driving the spike.
You can also leverage machine learning-powered dashboards, such as AWS Cost Anomaly Detection, to visualize spending trends and identify contributing factors. These dashboards often offer detailed insights into which resources or services are responsible, helping you zero in on the issue. For a thorough investigation, combine these automated tools with manual checks – like reviewing resource tags, usage logs, and billing reports. This approach ensures you not only find the root cause but also take swift action to get costs under control.
What are the best ways to prevent unexpected cloud cost spikes?
To keep cloud costs under control and avoid unexpected spikes, start by using real-time anomaly detection. This helps you spot unusual spending patterns as soon as they happen. Pair this with automated alerts and spending limits to ensure your team gets notified immediately if costs start to exceed expectations.
Make it a habit to regularly review your cloud usage. Look for idle resources, misconfigurations, or unused services that might be driving up your expenses unnecessarily.
On top of that, consider adopting a FinOps strategy. This means focusing on continuous monitoring and cost management practices, like setting clear budgets, analyzing usage trends, and making scalability adjustments when needed. By combining vigilance with automation, you can keep your cloud expenses in check while maintaining smooth operations.