Ultimate Guide to Docker Image Optimization

Optimizing Docker images is all about making them smaller, faster, and more secure. The benefits are clear: reduced storage costs, faster deployments, and fewer vulnerabilities. Whether you’re running SaaS applications or resource-heavy AI workloads, a leaner image improves efficiency across the board.
Key takeaways:
- Choose the right base image: Use lightweight options like Alpine, Distroless, or slim variants depending on your needs.
- Write smarter Dockerfiles: Use multi-stage builds, minimize layers, and clean up temporary files to save space.
- Leverage tools: Tools like Dive, DockerSlim, and Hadolint help analyze, optimize, and enforce best practices for your images.
- Measure results: Smaller images lead to faster pull times, lower costs, and better performance.
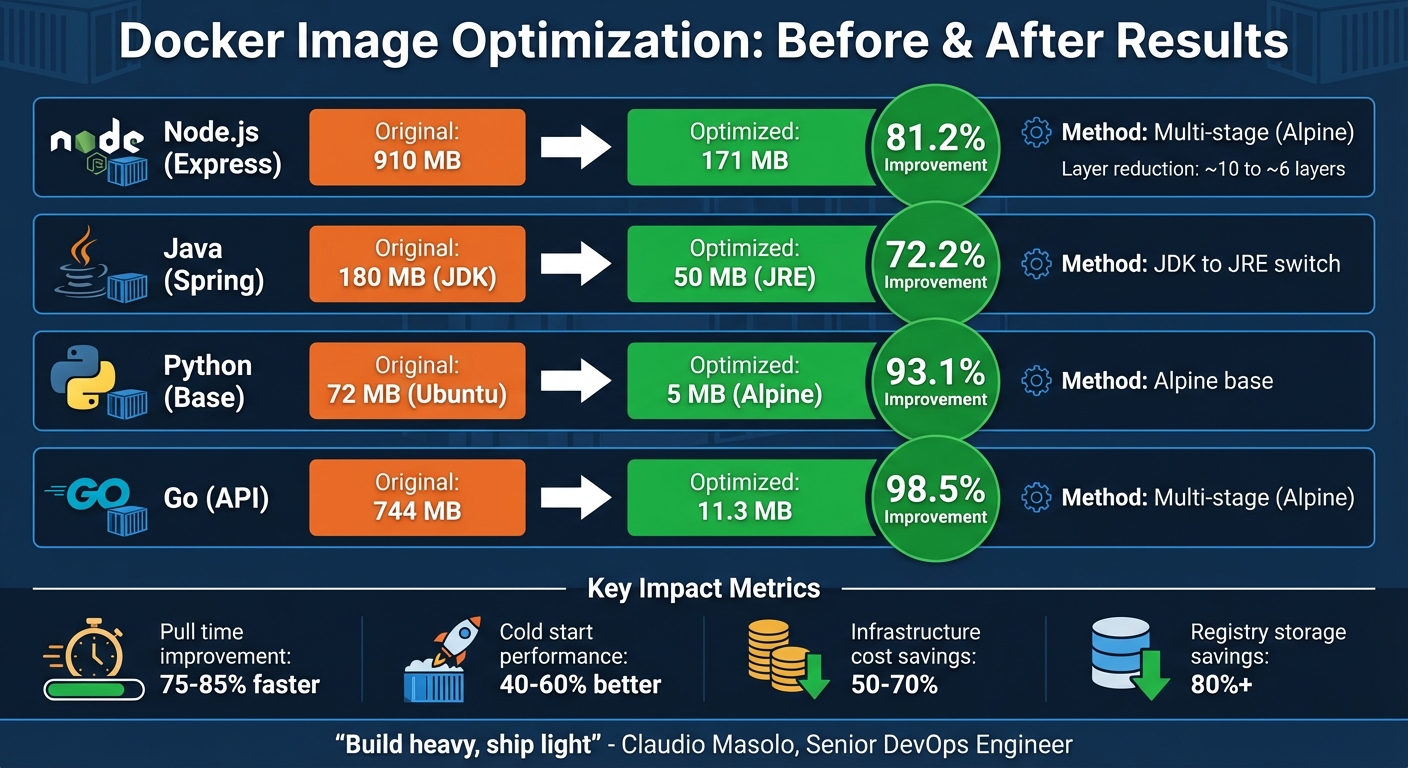
For example, switching from a 910 MB Node.js image to an Alpine-based 171 MB image cuts size by 81%. Similarly, a Go API image can shrink from 744 MB to just 11.3 MB using multi-stage builds. These optimizations save time, money, and resources while reducing the attack surface.
Docker Image BEST Practices – From 1.2GB to 10MB
Selecting the Right Base Image
The base image you choose sets the foundation for your final container image. A large, bloated base will lead to a similarly oversized final image. The ideal choice balances size, security, and compatibility – tailored to meet your application’s specific requirements. This decision also plays a critical role in determining how effective your optimization efforts will be later on.
Take Alpine Linux, for example. It’s a lightweight base image (around 5.59 MB) that includes a shell and a package manager called apk. However, it uses musl libc instead of the more common glibc, which can cause compatibility headaches with certain binaries. On the other hand, Distroless images strip away everything except your application and its runtime dependencies. This approach reduces vulnerabilities but makes debugging more challenging since it lacks a shell or package manager. Somewhere in between, slim variants retain glibc for better compatibility and remove unnecessary build tools, resulting in image sizes between 150 MB and 200 MB for environments like Node.js.
For example, a Go API image once shrank from a hefty 744 MB to just 11.3 MB using a multi-stage build process – showing how much size optimization can matter. Docker itself recommends Alpine as a starting point, describing it as "tightly controlled and small in size (currently under 6 MB), while still being a full Linux distribution". For production environments that prioritize security and don’t require interactive debugging, Distroless images provide a smaller attack surface. And if Alpine’s musl compatibility issues arise, slim variants can serve as a practical alternative.
Alpine Linux vs. Distroless Images
Alpine Linux offers more flexibility for debugging, while Distroless focuses on minimizing security risks by removing tools like shells and package managers.
Here’s a quick comparison:
| Feature | Alpine Linux | Distroless |
|---|---|---|
| Base Size | ~5–6 MB | Varies by runtime |
| Shell Included | Yes (sh) |
No |
| Package Manager | Yes (apk) |
No |
| C Library | musl libc |
Typically glibc |
| Best For | Lightweight apps | High-security production |
| Debugging | Easy | Challenging |
For instance, a standard Node.js application on a typical base image might weigh in at about 943 MB. Switching to Alpine can reduce that size to roughly 116 MB. Opting for a Distroless image can trim it down even further, cutting as much as 600 MB compared to Ubuntu-based images. Alpine is a good fit when you need to install additional packages or debug interactively, while Distroless is better suited for security-focused deployments where external monitoring tools suffice.
Using Official Slim Variants
If Alpine or Distroless doesn’t meet your needs, official slim variants offer another option. These images strike a balance between functionality and size by removing build tools and non-essential packages while keeping glibc for better compatibility. For example, a node:slim image is typically around 150–200 MB, compared to the 910 MB size of its full counterpart. Slim variants are particularly effective for production deployments in languages like Python, Node.js, and Java. They include everything necessary to run your application but exclude extras like compilers, Git, or development headers.
If you’ve ever encountered "no such file or directory" errors when using Alpine due to musl incompatibility, slim variants can often solve the problem without significantly increasing the image size.
The trick is to align your base image with your workflow. Use a full image during the build and testing phases, then switch to a slim variant for production. This approach keeps your containers lightweight and prevents unnecessary dependencies or logs from inflating your image during the COPY phase.
Writing Efficient Dockerfiles
Creating an efficient Dockerfile is crucial for faster deployments and smaller image sizes. Once you’ve chosen a base image, the next step is crafting a Dockerfile that not only reduces build time but also minimizes unnecessary bulk. The way you structure your instructions can significantly impact the image size and the time it takes to rebuild. The goal? Keep it lean, maximize caching, and avoid unnecessary layers – all while keeping the Dockerfile easy to read and maintain.
"Multi-stage builds let you reduce the size of your final image, by creating a cleaner separation between the building of your image and the final output." – Docker Documentation
Not all instructions in a Dockerfile affect the final image size. Only FROM, RUN, COPY, and ADD create layers that contribute to it. Other commands like ENV, WORKDIR, CMD, and ENTRYPOINT are more about configuration and don’t add significant weight. By understanding how Docker layers work, you can optimize your builds to reuse cached layers and avoid redundant operations. For example, a well-optimized Docker image can be up to 10x smaller than an unoptimized one, which is a game-changer in environments with limited bandwidth.
To use layer caching effectively, place commands that rarely change, like installing dependencies, at the top of your Dockerfile. Save steps that are more likely to change, such as copying source code, for the end. This way, heavy operations only run again when absolutely necessary.
Multi-Stage Builds
Multi-stage builds let you use multiple FROM statements in a single Dockerfile, each serving its own purpose. Typically, the first stage handles building or compiling, using a full-featured image with all necessary tools. The final stage then uses a minimal runtime image, containing only the essentials. This approach ensures that build-time tools and temporary files are left behind, resulting in a cleaner and smaller production image.
For example, in September 2024, Docker showcased this technique with a Java Spring Boot "Hello World" application. By splitting the Dockerfile into a builder stage (using a full JDK) and a final stage (using a slim JRE), the image size dropped from 880 MB to 428 MB. Similarly, in March 2019, developers Adnan Rahić and Timothy Nolan reduced a Go-based API image from 744 MB to just 11.3 MB by switching to a multi-stage build. They used golang:1.10-alpine3.8 for building and a lightweight alpine:3.8 image for the runtime.
To make multi-stage builds more manageable, name your stages using the AS <name> syntax (e.g., FROM golang:1.24 AS build). This makes it easier to reference specific stages with COPY --from, even if you rearrange their order. Additionally, Docker’s BuildKit can execute stages in parallel and skip unnecessary ones, improving build efficiency. With the --target flag, you can stop at a specific stage – ideal for debugging or creating separate debug and production images.
"By separating the build environment from the final runtime environment, you can significantly reduce the image size and attack surface." – Docker
For the final stage, choose a minimal base image like Alpine Linux, Distroless, or even scratch. This not only reduces the image size but also limits the attack surface. If you need pre-built binaries or tools, you can pull them from external images using COPY --from=<image_name>:<tag>.
Reducing Layers and Using Cache
To minimize the number of layers in your image, combine related commands with && and line breaks. For example, instead of running apt-get update, apt-get install, and cleanup commands in separate steps, chain them together. This ensures that temporary files, such as package manager caches and downloaded archives, are removed in the same layer where they are created.
"Each instruction in your Dockerfile creates a new layer. These layers are cached… but they also contribute to the final image size." – Bobby Iliev, Docker Captain
When working with dependency files like package.json or requirements.txt, copy them into the image first, install the dependencies, and then copy the rest of your source code. This ensures that the dependency installation layer is cached and reused, even if your application code changes.
For package installations using apt-get, always include the --no-install-recommends flag to avoid installing unnecessary extras. Combine apt-get update and apt-get install into a single RUN command to prevent caching outdated package indexes.
If your build process generates temporary files, use RUN --mount=type=bind to ensure they don’t become part of the final image layers. Enabling BuildKit (DOCKER_BUILDKIT=1) unlocks advanced features like --mount=type=cache for persistent package manager caches and allows for parallel execution of build stages. When using pipes in RUN commands, prefix them with set -o pipefail && to ensure that any failure stops the build.
Finally, for reproducibility and security, pin your base images to specific version tags or SHA256 digests (e.g., alpine:3.21@sha256:...). This locks your build to a known, tested version, making it more reliable and predictable.
Removing Unnecessary Files
Once you’ve fine-tuned your Dockerfile, the next step to keep your images lightweight is to eliminate temporary files and caches. Even a well-structured Dockerfile can still include unnecessary files in the final image. These leftovers take up space, slow down deployments, and may even introduce security vulnerabilities. To truly minimize your image size, it’s essential to remove these files within the same layer where they’re created. Why? Because Docker’s layered filesystem saves everything added in a layer – even if you delete it later.
"By installing unwanted libraries, we increase the chance of a potential security risk by increasing the attack surface." – Bibin Wilson, Cloud and DevOps Consultant
Whenever you’re installing packages, downloading archives, or generating temporary build files, make sure to clean up before the RUN instruction ends. For instance, on Debian-based images, package managers like apt-get create index files in /var/lib/apt/lists/* that aren’t needed at runtime. Similarly, tools like pip generate cache directories, and downloaded files (like .tar.gz archives) will stick around unless you explicitly delete them. The trick is to combine installation and cleanup into a single command, so these files never make it into your image’s history.
Cleaning Package Caches
Package managers such as apt-get, yum, and pip often leave behind caches and temporary files during installation. To keep your Docker images lean, always clean up these artifacts within the same RUN instruction where they’re created. For Debian-based images, you can combine commands like this:
RUN apt-get update && apt-get install -y --no-install-recommends <packages> && rm -rf /var/lib/apt/lists/* This approach ensures that unnecessary files are wiped out before the layer is finalized.
Here’s an example of how impactful this can be: in March 2019, a technical demo using a sample Go API showed how a standard Ubuntu-based build produced a 636 MB image. By switching to a multi-stage build with an Alpine Linux final stage, the image size dropped to just 11.3 MB. This was achieved by removing build tools like gcc, make, and the Go compiler from the production image.
For Python projects, you can avoid caching downloaded packages by using:
RUN pip install --no-cache-dir <package> If you’re working with archives (e.g., .tar.gz files), delete them immediately after extraction:
RUN curl -O https://example.com/file.tar.gz && tar -xzf file.tar.gz && rm file.tar.gz You can also take advantage of BuildKit’s cache mounts to use persistent caches during the build process without including them in the final image:
RUN --mount=type=cache,target=/var/cache/apt ... By cleaning up as you go, you’ll not only reduce image size but also improve deployment speed.
Using .dockerignore Files
Another way to streamline your Docker builds is by using a .dockerignore file. This file prevents unnecessary local files from being sent to the Docker builder, saving time and preserving caching benefits. By excluding files you don’t need, you reduce the amount of data transferred during the build – especially useful in remote or cloud-based environments.
Typical files to exclude are:
- Version control directories (e.g.,
.git) - Dependency folders (e.g.,
node_modules) - Build artifacts (e.g.,
dist/,target/, binaries) - Log files
- Sensitive data (e.g.,
.envfiles)
Excluding these files also prevents cache invalidation for COPY or ADD instructions, which keeps your builds consistent and efficient. The .dockerignore file supports glob patterns (like *.log or **/*.tmp), making it easy to exclude multiple files or directories. Simply create a .dockerignore file in the same directory as your Dockerfile and list everything you want to leave out.
sbb-itb-f9e5962
Tools for Image Optimization
Once you’ve fine-tuned your Dockerfile and eliminated redundancies, it’s time to take things a step further with specialized tools for image optimization. These tools help you identify and resolve inefficiencies that might not be obvious during manual reviews. They also automate processes that would otherwise involve guesswork and tedious experimentation. By combining Dockerfile improvements with these tools, you can achieve leaner, more efficient images.
Three standout tools for this task are Dive, DockerSlim (also known as SlimToolkit), and Hadolint. Each tool has a unique purpose: Dive provides a clear view of where your image is bloated, DockerSlim removes unnecessary components automatically, and Hadolint ensures best practices are followed from the start. Together, they create a comprehensive workflow for optimizing container images from development to production.
Dive for Layer Analysis

Dive is your go-to tool for visually analyzing Docker image layers. When you run dive <image-tag>, it breaks down the image layer by layer, showing you exactly what’s inside. It highlights files that were added, modified, or deleted across layers, helping you spot "wasted space." For instance, if a file is added in one layer but later removed or altered, it still contributes to the overall image size. Dive also generates an "image efficiency" score to give you a quick snapshot of how optimized your image is.
This tool is perfect for manual audits when an image turns out larger than expected. It helps identify inefficiencies that might have slipped through during Dockerfile refinements. For example, you can use Dive to combine commands or clean up temporary files in the same layer where they’re created. Dive supports both Docker and OCI images, making it compatible with a wide range of workflows.
DockerSlim for Automated Reduction
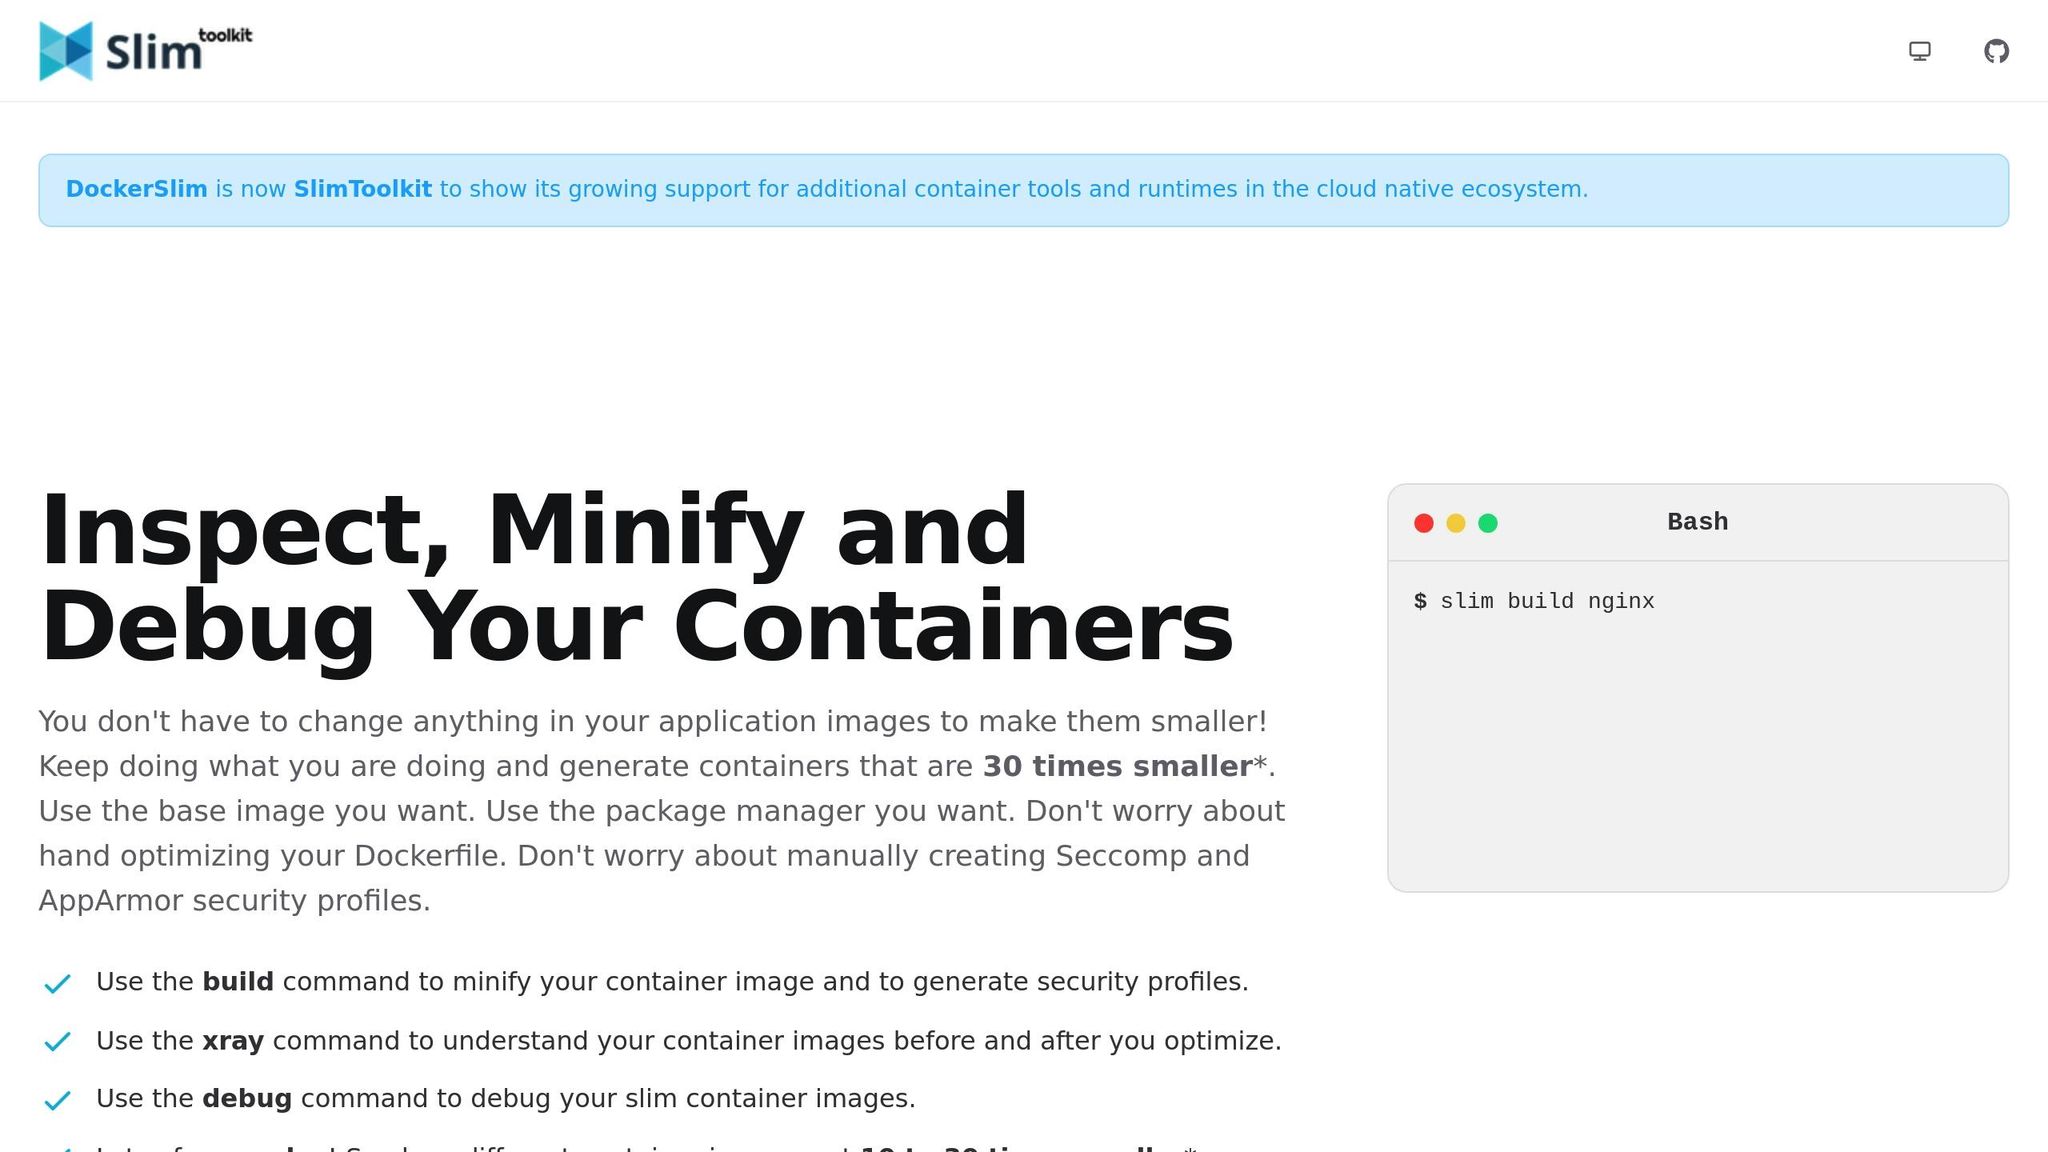
DockerSlim takes a different route by automatically analyzing what your application needs to run and stripping out everything else. Through static and dynamic analysis, it profiles your container’s runtime and produces a slimmed-down version that removes unnecessary files, shells, and package managers – all while keeping your application functional. This can result in dramatic size reductions, often up to 30x smaller, without requiring you to modify your Dockerfile.
For example, in February 2022, developer Ketan Desai used DockerSlim on a standard Nginx image. Running docker-slim build nginx reduced the original 142 MB image to just 12 MB – a 12.09x reduction – while maintaining full functionality. A simple curl request confirmed that the optimized image worked as intended.
"Docker-slim will optimize and secure your containers by understanding your application and what it needs using various analysis techniques. It will throw away what you don’t need, reducing the attack surface of your container." – Ketan Desai
Beyond reducing size, DockerSlim also enhances security by generating Seccomp and AppArmor profiles, which limit system calls and permissions. It even includes an xray feature that reverse-engineers a Dockerfile from an image, giving you insights into how layers were constructed. For production environments, DockerSlim is a powerful tool for quick and effective optimization.
Hadolint for Dockerfile Linting
Hadolint is a linter designed specifically for Dockerfiles. It scans your Dockerfile for common mistakes and ensures adherence to best practices before you even build your image. For instance, it catches issues like failing to combine apt-get update and install commands, neglecting the --no-install-recommends flag, or relying on the latest tag instead of specifying a version. By addressing these issues early, Hadolint prevents bloated or inefficient layers from being created.
Integrating Hadolint into your CI/CD pipeline or text editor allows you to enforce these standards automatically. It flags problems like using ADD instead of COPY, missing absolute paths for WORKDIR, or running containers as the root user. It also checks for security concerns, such as exposing unnecessary ports. By automating these checks, Hadolint reduces the need for manual reviews and ensures consistency across your team’s Dockerfiles.
| Tool | Primary Function | Best Use Case |
|---|---|---|
| Dive | Analysis & Visualization | Identifying bloated layers and wasted space. |
| DockerSlim | Automated Optimization | Minimizing production images and improving security. |
| Hadolint | Static Analysis (Linting) | Applying best practices during Dockerfile development. |
For optimal results, use Hadolint during development to catch mistakes early, Dive for auditing complex images, and DockerSlim to streamline production builds. Together, these tools provide both preventive and corrective measures for efficient container image workflows.
Measuring Results
Docker Image Optimization Results: Before and After Comparison by Application Type
Once you’ve optimized your Docker image, it’s time to evaluate the impact. This involves looking at deployment speed, resource consumption, and operational costs. It’s not just about shrinking the image size; it’s about seeing how those changes translate into real-world improvements. Docker commands make it easy to track these metrics and compare before-and-after results.
To start, use basic commands like docker images or docker image ls to check the final size of your image. For a more detailed breakdown, docker history <image-tag> shows the sizes of individual layers and highlights which commands contribute the most to the overall footprint. Want to measure build time? Simply prefix your build command with time docker build .... If you’re using BuildKit, enable it with export DOCKER_BUILDKIT=1 to get more detailed timing for each build stage. You can even format the output for easier analysis with a command like this:
docker images --format "{{.Size}}t{{.Repository}}:{{.Tag}}" | sort -h These tools and commands provide a clear snapshot of how your optimizations improve deployment speed and cost efficiency. Next, it’s essential to consider how image size impacts pull times and overall deployment performance.
Size and Pull Time Analysis
The size of your Docker image directly affects how quickly it can be pulled, which in turn influences deployment speed – especially when scaling across multiple servers in the cloud. Smaller images mean faster deployments, saving both time and resources.
"Every megabyte matters when you’re deploying thousands of containers." – Bobby Iliev, Docker Captain
Besides size, the number of layers in your image also plays a role. Each RUN, COPY, or FROM instruction creates a new layer. Reducing these layers minimizes metadata overhead, speeding up both builds and pulls.
Pull time isn’t just a performance metric; it has financial consequences too. Some teams have reported up to 60% savings on container registry costs simply by reducing image bloat. Smaller images also enhance security by limiting the number of packages and binaries, reducing the potential attack surface. Tools like docker scout cve can help audit your optimized images to ensure they remain secure without sacrificing performance.
Before and After Comparisons
To truly understand the benefits of optimization, comparing the "before" and "after" results is key. Real-world examples highlight just how impactful these changes can be. For instance, a Node.js image reduced from 910 MB to 171 MB using Alpine multi-stage builds – a massive 81.2% reduction. Similarly, switching from a full JDK to a JRE for Java applications shrinks the runtime image from 180 MB to 50 MB, a 72.2% improvement. Go applications can see even more dramatic results: a standard Golang base image of 744 MB can drop to just 11.3 MB with a multi-stage Alpine build, achieving a 98.5% reduction.
| Application Type | Original Image Size | Optimized Image Size | Layer Count (Approx) | Improvement % | Method Used |
|---|---|---|---|---|---|
| Node.js (Express) | 910 MB | 171 MB | Reduced from ~10 to ~6 | 81.2% | Multi-stage (Alpine) |
| Java (Spring) | 180 MB (JDK) | 50 MB (JRE) | N/A | 72.2% | JDK to JRE switch |
| Python (Base) | 72 MB (Ubuntu) | 5 MB (Alpine) | N/A | 93.1% | Alpine base |
| Go (API) | 744 MB | 11.3 MB | N/A | 98.5% | Multi-stage (Alpine) |
These examples show how optimized Docker images can be up to 10 times smaller than their original versions, leading to much faster deployments. When documenting your own optimizations, track not only the size but also layer counts, build times, and pull times. Tools like container-diff can help you compare the contents and file systems of your original and optimized images, ensuring you maintain functionality while eliminating unnecessary bloat.
Conclusion
Optimizing Docker images is a continual process that brings tangible benefits in performance, security, and cost efficiency. A streamlined Docker image can be up to 10 times smaller than its bloated counterpart. This reduction leads to 75–85% faster pull times and 40–60% better cold start performance.
For engineering teams, the financial impact is undeniable. Many have slashed cloud infrastructure costs by 50–70% through thoughtful containerization. Others have cut registry storage expenses by over 80% by simply reducing image sizes. As Claudio Masolo, Senior DevOps Engineer, aptly states:
"The philosophy is simple: build heavy, ship light".
Beyond saving money, trimming down your images also strengthens security. By removing unnecessary components like shells, package managers, and libraries, you minimize the attack surface and reduce the risk of vulnerabilities.
To fully reap these benefits, make optimization a core part of your DevOps practices. Automate checks in your CI/CD pipeline to catch unnecessary bloat as dependencies change. Use techniques like multi-stage builds, minimal base images, strategic layer ordering, and .dockerignore files to keep your images lean and efficient.
These strategies consistently lead to faster builds, quicker deployments, and lower costs. Start with your largest images, set a baseline, implement these optimizations, and monitor the results. Your infrastructure – and your budget – will thank you.
FAQs
What’s the best way to choose a base image for my Docker container?
Choosing the right base image is crucial for creating containers that are efficient, secure, and cost-effective. Start by opting for images from Docker Official Images or Docker Verified Publishers. These sources are trusted and regularly updated, ensuring better reliability. If you’re looking to save on storage and speed up downloads, slim or distroless variants, like python:3.12-slim, are excellent options. For applications that don’t require a full operating system, the minimal scratch image can be a smart choice – just be prepared to manually add any necessary libraries.
It’s important to pick a base image that matches your runtime and development requirements. For example, node:18-alpine is a lightweight choice for Node.js applications. To further streamline your builds, consider using multi-stage builds. This technique allows you to compile your application in a more complete image, such as golang:1.22, and then transfer the final output to a smaller runtime image. The result? A leaner and more efficient container.
By taking these steps, you can improve build times, cut down on cloud costs, and ensure smoother deployments. If you’re looking for help automating this process, TECHVZERO offers tools to integrate optimized base images into your CI/CD pipeline, delivering noticeable gains in both efficiency and cost savings.
What are the advantages of using multi-stage builds in Docker?
Multi-stage builds bring several advantages to the table when using Docker. By isolating the build environment from the final runtime image, they allow you to produce smaller, leaner images that are not only faster but also more secure. This separation minimizes potential vulnerabilities, reducing the attack surface and making it easier to manage security and compliance.
On top of that, multi-stage builds enhance the development workflow by introducing reusable stages, parallel processes, and effective caching mechanisms. These features can significantly cut down build times and streamline workflows, particularly for applications with complex requirements. In short, multi-stage builds are an essential tool for refining Docker images and simplifying deployment processes.
What tools can you use to automate Docker image optimization?
Automating Docker image optimization doesn’t have to be complicated if you have the right tools in your arsenal. Docker BuildKit is a standout option, offering features like parallel execution, automatic caching, and build-time secrets. These capabilities make it easier to produce efficient and repeatable builds. For even more convenience, Docker Build Cloud adds remote build functionality, reduces context size, and optimizes layer transfers. The result? Faster builds and smaller image sizes.
There are also practical techniques to consider. For instance, multi-stage builds let you separate build dependencies from the final image, automatically cleaning up unnecessary files. A properly set up .dockerignore file can exclude unneeded files from the build context, speeding up the process and limiting cache invalidation. On top of that, using cache mounts ensures that tasks like npm install or apt-get reuse previous downloads across builds, cutting down on repetitive work.
At TECHVZERO, we integrate these tools into efficient DevOps workflows, helping you create Docker images that are lean, deployment-ready, and less labor-intensive. These optimizations not only save time but also reduce costs and manual intervention.