How Ansible Simplifies Bare Metal Kubernetes

Running Kubernetes on physical servers (bare metal) offers better performance by removing the virtualization layer. But it also comes with challenges: managing hardware, networking, and OS configurations manually can be complex and error-prone. This is where Ansible helps.
Ansible automates the entire setup process, from configuring servers to deploying Kubernetes clusters. With a single playbook, you can ensure consistent, error-free configurations across all nodes. It handles tasks like disabling swap, setting up networking, and installing Kubernetes components. Plus, it supports advanced features like caching for air-gapped environments and managing out-of-band control (IPMI).
Key benefits of using Ansible for bare metal Kubernetes:
- Automates repetitive tasks, reducing errors.
- Ensures uniform configurations across all nodes.
- Simplifies adding new nodes or scaling clusters.
- Supports deployment of essential add-ons like MetalLB, monitoring tools, and storage solutions.
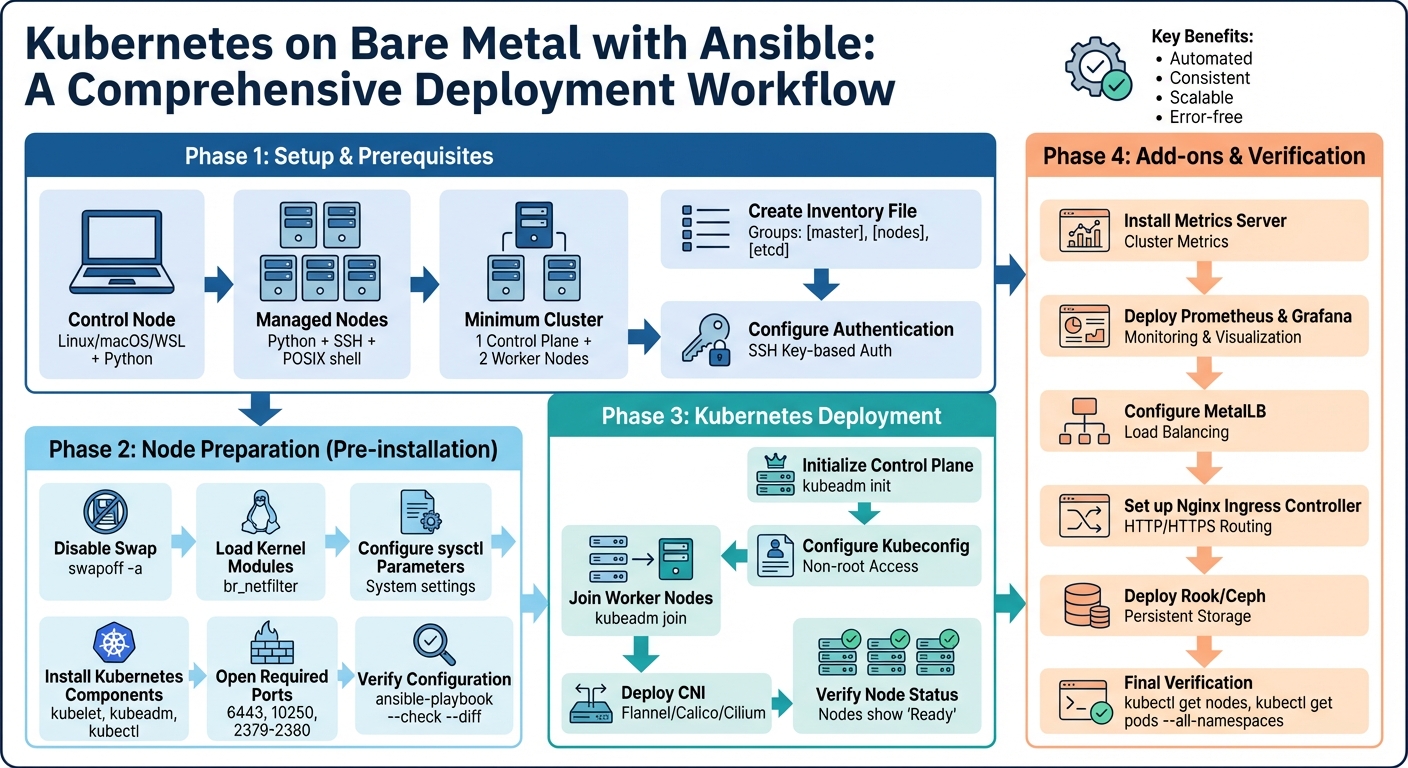
Complete Ansible Bare Metal Kubernetes Deployment Workflow
Provisioning a bare-metal Kubernetes cluster with Ansible
Setting Up Ansible for Bare Metal Kubernetes
Getting Ansible set up correctly is key to ensuring smooth, consistent deployments across your bare metal Kubernetes cluster. This process includes preparing your control machine, defining which servers will make up your cluster, and setting up secure communication channels.
Prerequisites and Requirements
The control node – where Ansible runs – needs to be a UNIX-like system such as Linux, macOS, or Windows Subsystem for Linux (WSL). It also requires Python to execute playbooks.
The managed nodes (your physical servers) don’t need Ansible installed. Instead, they just need Python, an account with SSH access, and a POSIX shell. A common choice for the operating system is Ubuntu 20.04 "Focal", often used in bare metal Kubernetes setups. Typically, you’ll need at least one node for the control plane and two or more worker nodes, though the exact number depends on your specific workload.
Creating an Ansible Inventory File
Once the prerequisites are in place, the next step is to define your cluster’s nodes and their roles in an inventory file. This file tells Ansible which servers to manage and what each server’s role is within the cluster. Hosts are usually grouped by function, such as [master] for control plane nodes, [nodes] for worker nodes, and [etcd] for the key-value store.
In bare metal setups, it’s important to separate the management IPs used for SSH from the service IPs used for Kubernetes communication. Use the ansible_host variable for SSH connections and a separate variable (e.g., ip) for internal Kubernetes networking. For example, your management network might use 10.0.1.x for SSH, while your cluster network could use 192.168.1.x for pod communication.
To keep things clean, you can use [group_name:vars] sections in the inventory file to define shared settings for a group of nodes rather than repeating them for each one. For broader settings like pod_network_cidr and service_cidr, you can define them in a group_vars/all.yml file. This is also where you decide whether to use single-stack (IPv4 only) or dual-stack (IPv4/IPv6) networking. Before moving forward, validate your inventory file with the command ansible-inventory -i <file> --list to catch any mistakes early.
With the inventory file ready, the next step is setting up secure SSH access for your deployments.
Configuring SSH Access
After defining roles and inventory, secure SSH access is essential for automation. Using SSH key-based authentication eliminates the need for passwords and allows deployments to run smoothly without interruptions. Start by generating an SSH key pair on your control node and then add the public key to the ~/.ssh/authorized_keys file of each server.
For better security and traceability, create a dedicated deployment user (e.g., kni) on all nodes. This user should have passwordless sudo privileges, which is safer and more auditable than using the root account. In your inventory file, specify the private SSH key’s location using the ansible_ssh_private_key_file variable. This ensures automated access without manual intervention. Ansible will then connect to all nodes simultaneously, executing tasks in parallel across the entire cluster.
Preparing Bare Metal Nodes with Ansible
To set up Kubernetes on bare metal, each node requires specific system-level tweaks. These adjustments ensure all nodes are configured identically, paving the way for a smoother Kubernetes deployment with Ansible. Automating this process with Ansible not only saves time but also minimizes the risk of manual errors.
Running Pre-installation Playbooks
The preparation playbook takes care of essential system modifications:
- Disabling Swap: Use
swapoff -ato turn off swap, and update/etc/fstabwith thelineinfilemodule to ensure it doesn’t reactivate after a reboot. - Loading Kernel Modules: Load the
br_netfiltermodule and make it persistent by creating a file in/etc/modules-load.d/. This step is vital for enabling network bridge functionality. - Configuring Sysctl Parameters: Set parameters like
net.bridge.bridge-nf-call-iptables = 1andnet.ipv4.ip_forward = 1to ensure proper network packet forwarding. - Installing a Container Runtime: Add the necessary repositories and install a runtime like
containerdorCRI-O. Configure it by generating files such asconfig.toml. - Installing Kubernetes Components: Install
kubelet,kubeadm, andkubectlwith version pinning to maintain compatibility. - Opening Required Ports: Ensure ports like 6443 (API server), 10250 (kubelet), and 2379-2380 (etcd) are open for communication.
Once these steps are complete, verify the configurations to ensure everything is ready for Kubernetes deployment.
Verifying Node Preparation
Before moving forward, use Ansible’s built-in tools to confirm the nodes are properly prepared:
- Run
ansible-playbook --check --diffto simulate the playbook execution and confirm no further changes are needed. - Check that
containerdandkubeletservices are active using theservice_factsmodule. - Test node connectivity by running
ansible <group> -m pingto ensure all nodes are reachable. - Verify the status of the kubelet service across all nodes with
ansible <group> -a "systemctl status kubelet". - Use the
statmodule to confirm that/etc/kubernetes/contains the necessary configuration files.
These checks ensure the nodes are fully prepared, setting the stage for a seamless Kubernetes deployment.
sbb-itb-f9e5962
Deploying Kubernetes with Ansible
Once your nodes are verified and prepared, it’s time to deploy the Kubernetes cluster using Ansible. At this stage, Ansible handles tasks like initializing the control plane, connecting worker nodes, and setting up pod networking through dedicated playbooks.
Setting Up the Control Plane
The control plane setup begins with kubeadm init, which generates the necessary certificates and join tokens. To ensure smooth deployment, define key variables in your Ansible inventory. For example:
- Set
kubernetes_pod_networkto align with your CNI plugin (commonly10.244.0.0/16for Flannel). - Specify the container runtime, such as Containerd.
- Pin the versions of
kubelet,kubeadm, andkubectlto prevent compatibility issues.
Once initialized, Ansible configures kubeconfig to allow non-root access and organizes nodes into groups like control_plane and worker for targeted playbook execution. For production environments, it’s recommended to have an odd number of control plane nodes – at least three – to ensure quorum and high availability. If you need to add more nodes later, generate a new join token with the following command:
kubeadm token create --print-join-command Adding Worker Nodes to the Cluster
After the control plane is operational, Ansible uses kubeadm join to add worker nodes. A variable like kubernetes_role: 'node' can help ensure worker-specific configurations are applied. Before running this process, make sure your Ansible control node has passwordless SSH access to all worker nodes.
Scaling the cluster is straightforward. Simply add the new worker node’s IP or hostname to your Ansible inventory under the worker group and re-run the relevant playbooks. It’s also helpful to maintain a cleanup playbook with specific tags to roll back changes if an installation fails – especially when working with bare metal servers.
Once all nodes are joined, you can finalize the setup by enabling pod networking.
Deploying a Container Network Interface (CNI)
A Container Network Interface (CNI) is essential for enabling communication between pods. After initializing the control plane – and before worker nodes host any pods – Ansible applies the CNI manifest. Popular choices for bare metal environments include:
- Flannel, which uses a default CIDR of
10.244.0.0/16for simple overlay networking. - Calico, offering advanced networking features like network policy support.
- Cilium, designed for high-performance networking using eBPF.
This step is automated using Ansible’s command or shell module. For instance:
kubectl apply -f <CNI_URL> Once the CNI is applied, playbooks can verify that all nodes show a "Ready" status and that pods can communicate across the cluster. For bare metal setups, pairing the CNI with MetalLB – also deployed via Ansible – provides LoadBalancer functionality, which is not included by default.
| CNI Provider | Common Use Case | Default Pod CIDR |
|---|---|---|
| Flannel | Basic overlay networking for labs and small clusters | 10.244.0.0/16 |
| Calico | Advanced networking with policy support | 192.168.0.0/16 |
| Cilium | High-performance networking with eBPF | Variable |
Installing Add-ons and Verifying the Cluster
Installing Add-ons with Ansible
Once your cluster and nodes are set up using Ansible, the next step is to ensure your production environment is fully equipped with the necessary add-ons.
Unlike cloud-based Kubernetes setups, bare metal clusters require you to manually install key add-ons like MetalLB, metrics-server, and Nginx Ingress Controller – tools that cloud providers often include by default. Using Ansible simplifies this process by automating the installation.
For straightforward deployments, the kubernetes.core.k8s module lets you apply YAML manifests directly. For more advanced tools like Prometheus or ArgoCD, the kubernetes.core.helm module can deploy Helm charts, with configuration values stored in group_vars. To keep things organized, create dedicated roles (e.g., roles/metallb, roles/monitoring, and roles/ingress) and manage them with boolean variables in defaults/main.yml. This approach makes it easy to enable or disable features as needed.
Here are some key add-ons recommended for production environments:
- metrics-server: Provides support for
kubectl topand enables Horizontal Pod Autoscaling. - Prometheus and Grafana: Offer monitoring and visualization through time-series data.
- MetalLB: Acts as a load balancer by managing IP address pools in bare metal environments.
- Cert-Manager: Handles SSL/TLS certificate automation.
- Rook/Ceph: Facilitates block, file, and object storage across physical nodes.
| Add-on Type | Common Tools | Purpose |
|---|---|---|
| Metrics | metrics-server | Enables kubectl top and autoscaling |
| Monitoring | Prometheus & Grafana | Collects and visualizes time-series data |
| Load Balancer | MetalLB | Simulates network load balancing |
| Ingress | Nginx Ingress Controller | Manages external HTTP/S access to services |
| Storage | Rook/Ceph | Automates block, file, and object storage |
Once these add-ons are installed, it’s time to confirm that your cluster is functioning as expected.
Verifying Cluster Health
After deploying the add-ons, it’s crucial to validate that your cluster is operating correctly. Here’s how to check its health:
- Use
kubectl get nodesto confirm all master and worker nodes are in theReadystate. - Run
kubectl get pods --all-namespacesto ensure system pods – like your CNI, CoreDNS, and add-ons – are up and running. - Verify that MetalLB is assigning external IP addresses by executing
kubectl get svc. - Test the metrics-server by running
kubectl top nodes. If you see valid CPU and memory data, it’s working as expected. - Execute
kubectl cluster-infoto confirm that the control plane and CoreDNS endpoints are accessible.
For a deeper functional test, deploy a sample Nginx application and expose it through your ingress controller. If the application routes traffic correctly to the pods, your networking layer is set up properly. To automate these checks, add a post-install role with the assert module. This will halt execution if any critical pods aren’t in the Ready state, ensuring issues are caught early.
Conclusion
Benefits of Using Ansible for Bare Metal Kubernetes
Ansible turns the often daunting process of setting up bare metal Kubernetes into a streamlined, automated workflow. Once your playbooks are ready, deploying entire clusters becomes a matter of minutes instead of hours. The declarative approach simplifies scaling – just update your inventory file and run the playbook, and you’re ready to go.
Deploying directly to bare metal offers a big advantage: it eliminates the performance overhead of virtualization. As zimmertr, a GitHub contributor, aptly noted:
Virtualization was becoming less and less of a need and more and more of a resource sink
. By skipping the hypervisor layer, you unlock the full potential of your hardware for containerized workloads.
Consistency across your infrastructure is another critical benefit. Manual setups often lead to configuration drift – those tiny, unnoticed differences between nodes that can snowball into major problems. Ansible ensures uniformity by managing essential configurations like NIC naming, RAID setup, and kernel parameters across all nodes. This consistency doesn’t stop at deployment; it extends to Day 2 operations. Whether you’re adding CNIs, configuring storage backends, or setting up monitoring tools, Ansible’s unified playbooks make it all seamless.
Next Steps
To make the most of these advantages, here are some steps to refine your deployment process.
- Streamline SSH access: Use
ssh-copy-idto set up passwordless automation, as outlined in the playbooks. - Create a detailed inventory file: Include node IPs, roles (master/worker), and IPMI credentials for out-of-band management.
- Plan for production readiness: Deploy at least three control plane nodes to ensure high availability.
- Adopt GitOps workflows: Tools like ArgoCD can help manage cluster states directly through Git.
- Set up persistent storage: Use orchestrators like Rook/Ceph for automated storage management.
- Enhance monitoring and networking: Integrate Prometheus and Grafana for advanced observability, and consider MetalLB for load balancing alongside Cilium or Calico for efficient networking.
FAQs
How does Ansible maintain consistent configurations across bare metal Kubernetes nodes?
Ansible simplifies maintaining consistent configurations across bare metal nodes by using a centralized playbook and inventory as the sole source of truth. It employs idempotent tasks, ensuring that each node reaches the desired state without introducing unintended changes.
Here’s how it works: you start by defining a static inventory that lists all your nodes. Then, you create a playbook outlining the required configuration – this could include installed packages, kubeadm settings, and networking details. When you run the playbook, Ansible applies the same tasks to every node via SSH, ensuring they all align with the specified configuration. Afterward, it provides a detailed report, highlighting whether changes were made or if nodes were already configured correctly.
By automating this process and keeping it version-controlled, Ansible prevents configuration drift and ensures that every node in your Kubernetes cluster is set up and maintained uniformly.
What do I need to set up Ansible for managing a bare metal Kubernetes cluster?
To manage a bare metal Kubernetes cluster using Ansible, you’ll need a few essential components in place:
- A control machine with Ansible installed: Make sure you’re running Ansible version 2.9 or higher. Configure an
ansible.cfgfile tailored to your setup, disable host-key checking, and install any required Ansible collections. - SSH access to nodes: Set up an SSH key pair on your control machine and establish password-less access to all target nodes. Test the connections to confirm everything is working smoothly.
- Inventory file: Create an inventory file that lists all nodes, including both control-plane and worker nodes. If you need out-of-band management, include details for the Baseboard Management Controller (BMC).
Beyond these components, verify that your bare metal nodes meet the necessary prerequisites. This includes running a compatible Linux OS, such as RHEL 8.x, having adequate hardware resources, and ensuring the network is properly configured for cluster communication. These preparations will set the stage for automating your Kubernetes cluster setup with Ansible.
How does Ansible simplify scaling a bare-metal Kubernetes cluster?
Ansible simplifies the process of scaling a bare-metal Kubernetes cluster by automating essential tasks and maintaining consistency across the environment. Using an inventory file as the central source of truth, adding new servers becomes straightforward – just update the file. From there, Ansible playbooks take over, automating everything from operating system setup to network configuration and Kubernetes installation, ensuring new nodes integrate smoothly into the cluster.
Expanding your cluster is as easy as adding new hosts to the inventory file and running the relevant playbook. Ansible handles critical tasks like distributing certificates and labeling nodes, streamlining the process and reducing the risk of errors. Beyond scaling, Ansible also helps manage updates, apply configuration changes, and oversee supporting services across the cluster. This minimizes manual effort and ensures your infrastructure remains reliable and ready to grow.