Audit‑Driven Savings: How a 2‑Week Billing Audit Pays for Itself

Cloud costs are eating into budgets. Many companies waste 30%-50% of their cloud spend due to untagged resources, idle infrastructure, and inefficient settings. A two-week billing audit can quickly identify where money is being wasted and help recover 30%-60% of cloud expenses.
Here’s how it works:
- Week 1: Gather data, organize billing reports, and identify key cost drivers like over-provisioned resources or untagged expenses.
- Week 2: Analyze findings, validate savings opportunities, and create an actionable plan to cut costs.
For example, a SaaS company spending $45,000/month on AWS identified $22,400 in potential savings during a two-week audit. Immediate actions like shutting down idle databases and optimizing storage reduced their bill by $4,000/month in just one week.
Key fixes include:
- Deleting unused resources (e.g., orphaned storage, idle VMs)
- Rightsizing over-provisioned infrastructure
- Optimizing default settings (e.g., storage tiers, NAT Gateway usage)
- Enforcing tagging policies for better cost tracking
A two-week audit doesn’t just save money – it provides clarity and accountability for cloud spending. With immediate savings often covering the audit cost, it’s a quick, effective way to improve financial health.
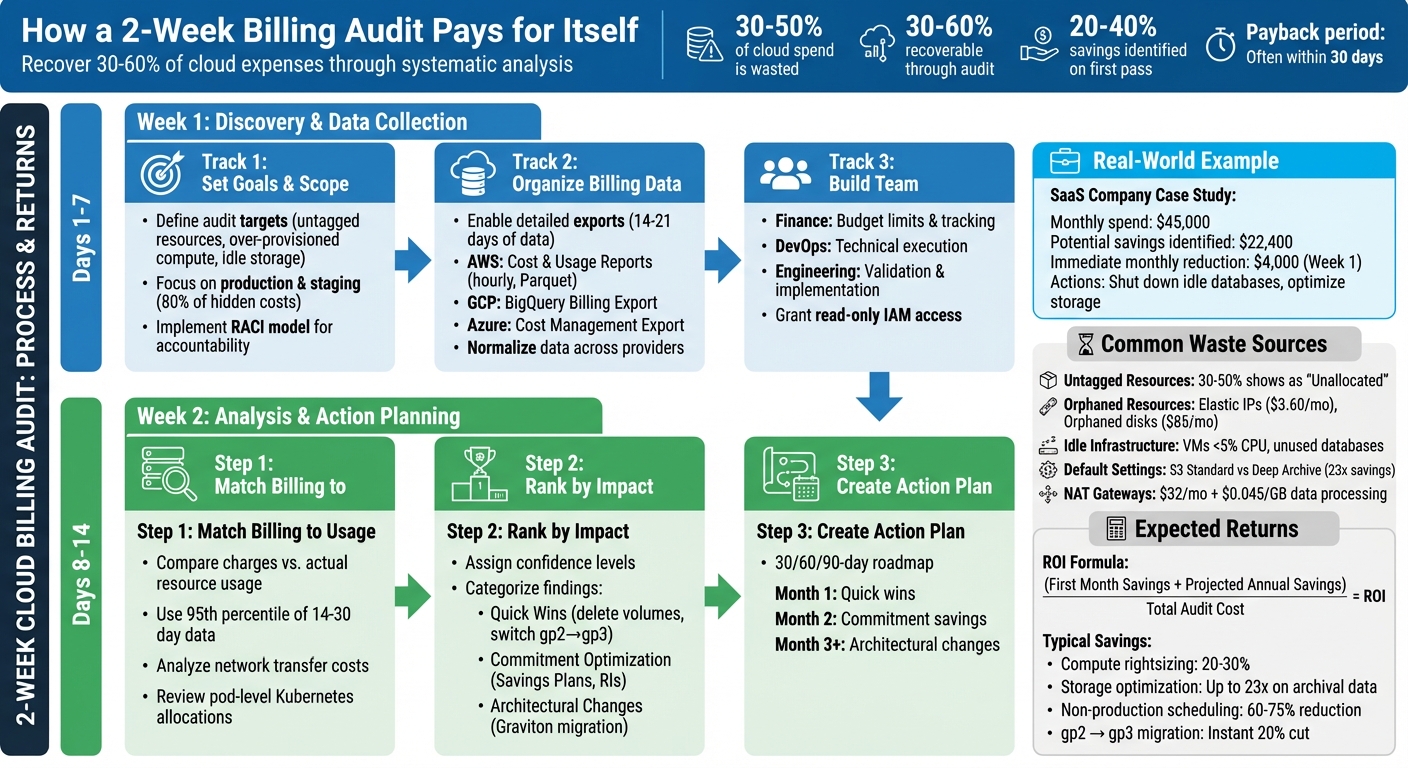
2-Week Cloud Billing Audit Process and Expected Savings
Week 1: Discovery and Data Collection
Setting Audit Goals and Scope
Start by defining what you want to achieve with your audit. Are you looking for untagged resources, over-provisioned compute, or idle storage? Instead of trying to tackle everything at once, focus on two or three specific targets. For instance, production workloads and staging environments are great places to start since they typically account for 80% of hidden cloud costs.
Timing matters, too. If your monthly cloud spending has spiked by more than 15%, or you’re approaching budget season, it’s a good time to begin. Structure your audit using "Scopes" – these are cost groupings based on team, application, or business unit – rather than relying solely on raw account structures. This approach makes ownership clearer and helps assign accountability.
To avoid confusion during the audit, implement a simple RACI model. Assign roles like this: DevOps engineers handle execution, engineering leads approve changes, finance sets budget targets, and product owners are informed of any performance impacts. This setup reduces the risk of "fear of deletion", where resources linger because no one knows who owns them.
Organizing Billing Data for Analysis
Get detailed billing data exports up and running as soon as possible. For AWS, use Cost and Usage Reports with hourly granularity and resource IDs, stored in Parquet format on S3. On GCP, enable BigQuery Billing Export with full line-item granularity and instance-name labels. For Azure, use Cost Management + Billing Export with daily frequency, sent to a Storage Account.
Collect 14–21 days of CPU, RAM, and IOPS data to ensure you’re capturing peak usage patterns. To simplify analysis, normalize your data across providers. For example, map AWS tags to GCP labels and create a unified list of service names. Also, establish a basic tagging taxonomy with fields like owner, application, environment, and cost center.
"Cloud spending stays explainable only when billing exports, allocation rules, and ownership data are stable across AWS, Azure, GCP, and Kubernetes." – Cloudaware
Once your data is normalized and tagged, you’ll be ready to bring your team together for actionable insights.
Building the Right Team
Use your organized billing data to assemble a focused, cross-functional team. Include stakeholders from finance, engineering, and compliance. Finance sets budget limits and tracks spending at the application level. DevOps and platform leads take care of technical tasks like rightsizing, scheduling, and cleaning up resources. Engineering leads confirm whether resources are idle and implement changes during sprint cycles.
To keep the audit secure, grant read-only IAM access to billing exports. This ensures no disruptions to production environments. A good example of this approach is Caterpillar, which in January 2026 implemented a cloud cost framework using Cloudaware. Their system automated daily billing ingests from AWS, Azure, and GCP, normalizing the data into a single model by 6:00 a.m. CST. They used CMDB enrichment to map costs to applications and business units, enforced tag compliance within 24 hours of resource creation, and replaced spreadsheets with live variance reports and weekly FinOps reviews integrated into Jira and Slack.
To stay on track, establish a regular review schedule: daily for anomaly triage, weekly for tag audits and waste reviews, and monthly for commitment planning. This ensures your team remains aligned and turns insights into concrete actions.
sbb-itb-f9e5962
9 expert level ways to reduce customer cloud costs
Common Billing Problems and Waste
Once your data is organized and your team is ready, it’s time to tackle some common billing issues that might be quietly draining your budget. Most cloud-related overspending falls into three main categories: tagging issues, forgotten resources, and default settings that inflate costs.
Untagged or Incorrectly Tagged Resources
If 30% to 50% of your cloud expenses show up as "Unallocated" in your financial reports, it’s a clear sign of tagging problems. Tags are essential metadata – like Owner, Project, Environment, or CostCenter – that help trace costs back to specific teams or projects. Without them, accountability becomes a guessing game.
Inconsistent tag naming or case sensitivity can cause duplicate or missing data, making it harder to track spending. Generic resource names like "test-server-123" don’t provide any meaningful context about their purpose. Resources without an "Owner" tag often turn into zombie infrastructure, running indefinitely because no one claims responsibility. Even when instances are terminated, related resources like volumes or snapshots can remain active if they aren’t properly tagged. Shadow IT – resources created outside official workflows – also escapes financial oversight.
"The moral is that you can’t control what you don’t see, and you can’t see what you don’t tag." – CloudQuery
Fixing tagging issues during an audit can uncover hidden costs. Start by enabling user-defined tags in your billing console and automating tag application during deployment with Infrastructure as Code. Enforce strict policies that block resource creation without required tags, and regularly run queries to identify missing tags.
Unused or Orphaned Resources
Orphaned resources are assets like detached storage or unassociated IP addresses that continue to rack up charges even after their parent instances are terminated. Zombie resources, on the other hand, are still active but serve little to no purpose – like virtual machines (VMs) with CPU usage under 5% or databases that haven’t been queried in months.
Take VERMEG‘s example: during their 2025 migration to AWS, the company initially matched server specifications one-to-one without checking actual usage. Automated tools later flagged idle instances, and by resizing resources appropriately, they cut AWS on-demand costs by over 39% in just ten months.
Common offenders include:
- Elastic IPs ($3.60/month each)
- Orphaned 500GB SSD disks in GCP ($85/month)
- Idle load balancers ($16/month, even with no traffic)
- NAT Gateways ($32/month in hourly fees, plus $0.045/GB for data processed)
One way to identify waste is the "Scream Test": stop a resource and wait 14–30 days to see if anyone reports an issue. If no one does, it’s likely safe to terminate. Before deleting, always snapshot volumes or databases and tag them with lifecycle policies for automatic cleanup after six months. For sandbox environments, set Time-to-Live (TTL) tags to trigger termination after 48 hours.
Provider Default Settings That Increase Costs
Cloud providers often prioritize availability over cost-efficiency. For example, the default S3 storage class is Standard (Hot tier) at $0.023/GB, but moving less-used data to Deep Archive costs just $0.00099/GB – a 23x savings. Similarly, CloudWatch log groups default to "Never Expire", leading to ongoing charges for logs you no longer need. When you terminate an EC2 instance or Azure VM, any attached storage volumes often persist and continue to accrue costs.
Other common issues include:
- NAT Gateways deployed in every Availability Zone for redundancy, incurring both hourly fees and $0.045/GB for data processing – even when free VPC Gateway Endpoints could handle the traffic.
- Incomplete multipart uploads to S3, which remain indefinitely.
- Enabling S3 versioning without lifecycle rules, leading to charges for every old object version.
- EBS volumes created during instance launches that don’t inherit tags from their parent EC2 instances, contributing to unallocated spend.
"Your AWS bill tells you what you spent. It doesn’t tell you what you wasted." – Hoang Le, Founder, INNOMIZE
To address these issues, set retention periods for CloudWatch logs (e.g., 30 or 90 days), use S3 Lifecycle Policies to move older data to cheaper storage tiers, and replace NAT Gateways with VPC Endpoints for services like S3 and DynamoDB. Tools like AWS S3 Intelligent-Tiering and GCP Autoclass can also automatically adjust storage tiers based on usage patterns.
Week 2: Analysis, Validation, and Action Planning
With your data now organized and waste patterns identified, Week 2 focuses on turning those insights into actionable steps. This is where raw numbers evolve into a detailed plan to cut costs and optimize resources.
Matching Billing Data with Actual Usage
Start by comparing your billed charges with actual resource usage – this step is crucial for pinpointing where your money is going. For example, extract billing details from AWS reports or GCP exports, then cross-check them with performance metrics like CPU, memory, and I/O from tools such as CloudWatch or Cloud Monitoring. Use the 95th percentile of 14- to 30-day usage data to identify overprovisioned instances.
For network-related expenses, analyze "Data Transfer Out" charges. Correlate billing IDs with VPC Flow Logs to track traffic volume, and use Route 53 DNS Query Logs to see which external domains are receiving data. If you’re using Kubernetes, dig into pod-level resource requests and limits to identify inflated resource allocations within clusters. Adding a Configuration Management Database (CMDB) to this process provides extra context by linking resources to specific applications, teams, or environments (e.g., production versus development).
A thorough cloud cost analysis often reveals 20% to 40% in potential savings during this initial pass. Many organizations overpay by 30% to 35% due to idle capacity, overprovisioning, and missed opportunities for discounts.
Ranking Findings by Financial Impact
After identifying inefficiencies, prioritize them based on their potential financial impact, the effort required to address them, and associated risks. Assign a confidence level to each recommendation. For example, an instance running below 10% CPU utilization for 30 days offers high confidence for rightsizing, while resources with erratic usage patterns may need further review.
Group your findings into three categories:
- Quick Wins: Simple, low-risk fixes like deleting unattached volumes or switching from gp2 to gp3 storage.
- Commitment Optimization: Financial strategies such as leveraging Savings Plans or Reserved Instances.
- Architectural Changes: Longer-term projects like transitioning workloads to Graviton processors.
Follow a structured approach: first eliminate "zombie" resources (unused or forgotten assets), then rightsize your infrastructure, and finally apply commitment-based discounts to your optimized environment. As FinOps expert Mike Fuller aptly puts it:
"Removing gravity before adding wings".
This prioritization creates a clear framework for your next steps.
Building an Action Plan
Develop a 30/60/90-day roadmap with specific owners and measurable goals. The first month should focus on quick wins like cleaning up idle resources, migrating storage tiers, and scheduling non-production environments. Month two can center on implementing commitment-based savings tools like Savings Plans or Reserved Instances. Month three and beyond can tackle architectural changes such as workload refactoring.
Each recommendation should have an assigned owner, a service-level agreement (SLA), and an estimate of monthly and annual savings. For instance, deleting unused EBS volumes might save $1,000 per month, while rightsizing compute resources could reclaim 25% to 40% of compute costs. Always test changes in staging or development environments before rolling them out to production.
To maintain these savings, establish governance measures such as automated tagging policies, budget alerts at 80%, 90%, and 100% of spend, and anomaly detection systems. These controls ensure that the savings identified in Week 2 don’t quietly disappear in the months that follow.
Tools and Methods for an Efficient Audit
Using the right tools can transform a two-week audit into a streamlined process, saving time and improving accuracy. By automating repetitive tasks and leveraging cloud-native platforms, you can cut down weeks of manual effort into just a few days.
Cloud Provider Native Tools
AWS Cost Explorer is a powerful tool that lets you visualize spending trends across different timeframes – daily, monthly, or even hourly. It updates cost data daily and provides historical insights for up to the past 12 months. The Billing and Cost Management Home Page simplifies audits with widgets like "Top Trends" for spotting month-over-month changes, "Cost Breakdown" for categorizing expenses by service or tag, and "Savings Opportunities" for highlighting immediate cost-cutting actions. For more intuitive analysis, Amazon Q Developer supports natural language queries like, "Which region had the largest cost increase last month?".
Similarly, Microsoft Cost Management organizes cloud spending by resource group, service, location, or tag and integrates Azure Copilot to provide AI-driven summaries and actionable recommendations. Both AWS’s Cost Optimization Hub and Azure Advisor offer prioritized suggestions based on financial impact, such as deleting unused resources, resizing over-provisioned instances, or purchasing Savings Plans. For a clearer picture of upfront investments like Reserved Instances or Savings Plans, switch to the "Amortized Costs" view. This approach spreads upfront fees across usage, offering a more accurate look at daily operational costs.
Beyond these visualization tools, automation can further simplify tagging and governance tasks.
Automation for Tagging and Visibility
Manual tagging can slow down audits and introduce errors. Infrastructure-as-Code (IaC) tools like Terraform and Bicep allow you to define default_tags for automatic tagging of resources. Policies like AWS’s Service Control Policies (SCPs) or Azure Policy can enforce tagging rules by denying the creation of untagged resources. This ensures that mandatory tags like CostCenter or Environment are always applied, preventing untracked costs from slipping through.
For older infrastructure that predates tagging policies, automation scripts can help. Python and Bash scripts using cloud SDKs (e.g., Boto3 for AWS) can scan thousands of resources in seconds, identifying and applying missing tags. Additionally, AWS Config rules can monitor resources for missing cost allocation tags and trigger alerts for non-compliance.
"Tags are the single most important mechanism for organizing resources, tracking costs, and automating operations in AWS".
Once tagging and governance are in place, real-time monitoring ensures continuous oversight.
Monitoring and Alert Systems
AWS Cost Anomaly Detection uses machine learning to flag unusual spending patterns. It can be configured to monitor specific cost allocation tags, such as Key=OS, Value=Windows, and typically starts sending alerts within 24 hours of setup. Alerts can be based on absolute amounts (e.g., spending exceeds $1,000) or percentage-based changes (e.g., a 20% increase in costs), helping you catch both sudden spikes and gradual inefficiencies.
For seamless collaboration, billing alerts can be routed through Amazon SNS to platforms like Slack, Microsoft Teams, or Amazon Chime, ensuring quick action from your team. In Azure, budget alerts can trigger automated "Action Groups" to stop resources and prevent further charges. Azure Advisor updates its cost recommendations daily, offering savings of up to 65% through savings plans and up to 72% through reservations. After deploying new resources, monitor forecasted costs daily to stay ahead of potential overruns.
Measuring Returns and Maintaining Savings
Calculating Audit Returns
When evaluating the financial impact of a two-week audit, it’s all about comparing the audit’s cost to the savings achieved in just the first 30 days. Here’s a straightforward formula for ROI: (First Month Savings + Projected Annual Savings) / Total Audit Cost. Take this example: In March 2026, Chinonso Amadi conducted a one-afternoon audit for an AWS-based fintech platform. The result? They identified $2,918 in monthly recurring savings, which amounts to $35,016 annually. The team achieved this by deleting 37 unattached EBS volumes, right-sizing 53 over-provisioned Node.js microservices, migrating RDS instances to Graviton, and avoiding a $2,628 monthly surcharge by upgrading PostgreSQL 13 instances before extended support pricing kicked in.
Structured audits often reveal savings opportunities of 20–40% on the first pass. To track these savings, use specific formulas. For compute rightsizing, calculate (Old Hourly Rate − New Hourly Rate) × Hours × Utilization Coverage. For commitment value, the formula is On-Demand Cost × Discount % × Coverage %. Many audits pay for themselves within 30 days, thanks to immediate actions like removing orphaned resources or migrating EBS volumes from gp2 to gp3, which alone delivers an instant 20% cost cut. These metrics highlight how even a brief audit can lead to measurable and ongoing savings.
This data lays the groundwork for effective governance strategies.
Setting Up Governance Controls
Cost governance starts with clear policies to prevent unnecessary spending. Tools like AWS Service Control Policies (SCPs) or Azure Policies can block the creation of high-cost resources or deployments in unauthorized regions. Enforce mandatory tagging for attributes like Owner, Environment, and CostCenter using automated policies that flag or deny untagged resources. Aiming for at least 95% tagging compliance helps eliminate unallocated expenses. Assign clear ownership for resource deletion decisions to address the common hesitation to delete unused resources, which often leads to waste.
"Cost governance isn’t about being cheap. It’s about spending intentionally – knowing where every dollar goes and making sure it’s delivering value." – Nawaz Dhandala, Author
Set budget alerts at key thresholds – 80% (to review trends), 90% (to validate assumptions), and 100% (to escalate and reforecast) of forecasted spend. Implement machine learning-based cost anomaly detection to catch unusual spending patterns within 24 hours, reducing the risk of unexpected "bill shock" from runaway processes. Automate cost-saving actions, such as shutting down non-production environments during off-hours (8 PM to 8 AM) or deleting unused resources like unattached EBS volumes or Elastic IPs, using tools like AWS Lambda and EventBridge.
These governance measures build on audit findings, ensuring savings extend well beyond the initial month.
Ongoing Cost Reduction Strategies
Governance alone isn’t enough – consistent reviews are key to maintaining long-term savings. Establish a regular review process: conduct weekly scans to identify and address orphaned resources, analyze service-level cost changes monthly (focusing on the top 20 movers), and review Savings Plan and Reserved Instance coverage quarterly. To speed up remediation, send cost anomalies and optimization recommendations directly to resource owners via Slack or Jira, bypassing the need for a central FinOps team. Organizations with strong optimization practices often save 20–30% on compute costs through rightsizing.
Keep an eye on unit economics, such as "cost per transaction" or "cost per active user", to ensure cloud spending aligns with business growth rather than scaling uncontrollably. Integrate tools like Infracost into your CI/CD pipeline to help engineers understand the financial impact of infrastructure changes before deployment. Before committing to Savings Plans or Reserved Instances, focus on rightsizing and waste removal. Use 95th percentile CPU and memory metrics over at least 60 days to avoid locking in discounts for unused capacity. Automate scheduling for development and staging environments to cut up to 128 hours of idle time per week, reducing costs for those environments by 60–75%.
Conclusion: Why a 2‑Week Audit Pays for Itself
Key Takeaways
A two-week audit can be a game-changer, often uncovering 30% to 60% of recoverable spend with tangible results emerging as early as the first week. Considering that 31% of IT leaders estimate half their cloud spending is wasted, even a short audit can transform a confusing invoice into a clear, actionable breakdown of where every dollar is going.
Using cloud-native tools, you can quickly access historical usage data to identify idle resources, over-provisioned workloads, and inefficiencies in your architecture – no need to wait for new metrics. The first week typically focuses on straightforward, low-risk changes, such as deleting unattached EBS volumes or migrating from gp2 to gp3 storage, which can deliver immediate savings. During the second week, findings are validated, prioritized by financial impact, and used to create an actionable plan. This ensures you avoid locking in waste through premature Savings Plan commitments.
A Key Insight: Companies that commit to financial contracts before performing an audit often end up using only 63.8% of their agreements because they optimize their infrastructure afterward. The takeaway? Optimize your resources first, then lock in financial commitments. By implementing governance measures like mandatory tagging, automated shutdown schedules, and anomaly detection, you can ensure that savings are sustained long after the audit is complete.
"Cloud infrastructure drifts toward waste the same way a codebase drifts toward complexity. If left unchecked, costs climb monotonically."
Next Steps for Scaling Companies
Once the audit is complete, scaling companies can take immediate steps to capitalize on the findings and drive cost efficiency.
Start by addressing your largest problem areas. If you’re unsure where waste is hiding, begin by tagging resources with attributes like "Owner", "Environment", and "CostCenter." This approach transforms unallocated spending into clearly defined line items that teams can own and optimize.
Focus the first week on quick wins that require minimal engineering effort, such as terminating idle RDS instances, removing orphaned storage volumes, and automating scheduling for non-production environments – steps that can cut costs by 60–75%. Use the second week to dive deeper into usage patterns, ensuring that rightsizing decisions are based on actual workload behavior rather than temporary peaks. Once your infrastructure is streamlined, apply Savings Plans to lock in discounts of up to 66–72% on your optimized baseline.
While the audit itself might only take an afternoon, the follow-up work can deliver measurable returns within 30 days, often covering the cost of the audit multiple times over. A two-week audit equips you with the visibility, tools, and governance framework needed to keep your cloud costs aligned with your business goals as you grow.
FAQs
What should I include in a 2-week cloud billing audit scope?
A two-week cloud billing audit should target critical areas such as resource tagging, waste detection, and cost analysis. The goal is to pinpoint idle resources, evaluate cost drivers, and confirm that resources are appropriately sized and scheduled. During this period, you should also assess reserved instances, track any unusual cost patterns, and implement automated tagging policies. This approach helps identify inefficiencies and fine-tune spending within a concise timeframe.
How do I find untagged or orphaned resources without breaking production?
To identify untagged or orphaned resources without risking your environment, rely on telemetry and automation tools. These tools can help pinpoint idle or underused assets – like unattached storage volumes or outdated snapshots – by analyzing metrics such as CPU usage and network activity over a 7–14 day period.
Implement mandatory tags, such as Owner and TTL (Time to Live), to minimize the chances of resources becoming orphaned in the future. Before removing any resources, use AWS tools to verify that they aren’t critical to your operations, ensuring your production environment remains unaffected.
When should I buy Savings Plans or Reserved Instances after an audit?
To save on cloud costs, consider Savings Plans or Reserved Instances, but only after carefully analyzing your cloud usage and ensuring your workloads are stable and predictable. A good rule of thumb is to aim for covering about 60–70% of your baseline usage. This strategy works best once your workloads are properly optimized and right-sized. It helps you maximize savings without risking overcommitment or locking yourself into unnecessary expenses.