How to Run GPUs on Bare Metal for 3× Lower Cost

Cloud GPU costs are skyrocketing, but there’s a way to cut expenses by up to 66%: switch to bare metal GPUs. Here’s why and how:
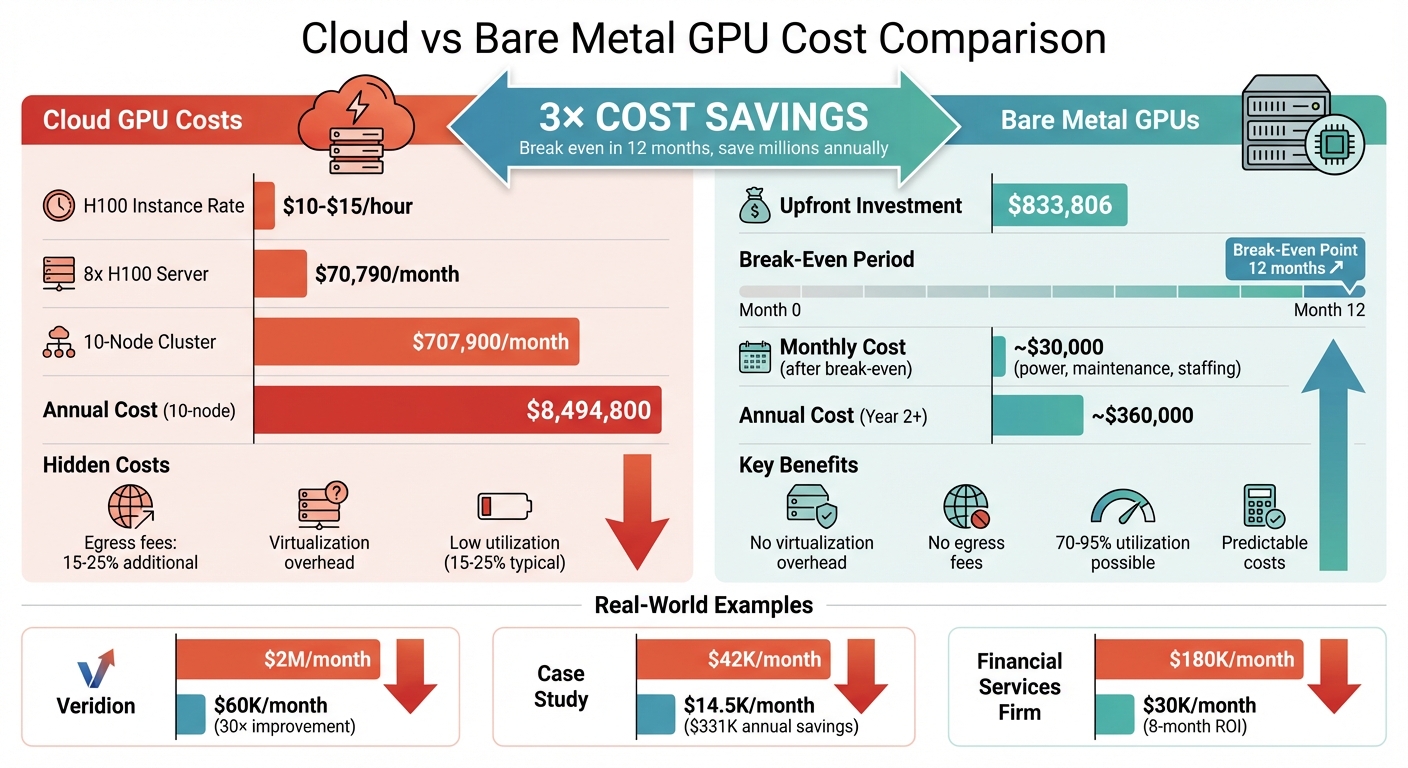
- Cloud GPU Costs: Major providers charge $10–$15/hour for A100 and H100 instances, with an 8x H100 server costing ~$70,790/month. Scaling to 10 nodes? That’s $707,900/month.
- Bare Metal Savings: Buy equivalent hardware for ~$833,806 upfront and break even in ~12 months. Plus, you avoid hidden costs like egress fees, virtualization overhead, and low GPU utilization common in cloud setups.
- Key Benefits:
- No virtualization overhead: Full GPU performance.
- No egress fees: Saves 15–25% on inference-heavy workloads.
- Predictable costs: Fixed monthly pricing simplifies budgeting.
Switching to bare metal involves setting up hardware, installing NVIDIA drivers, and configuring Kubernetes for GPU workloads. Tools like the NVIDIA GPU Operator streamline Kubernetes deployment, while workload optimizations (e.g., Multi-Instance GPU, autoscaling, and checkpointing) ensure high utilization and cost efficiency.
Example: Veridion slashed cloud GPU costs from $2M/month to $60K/month by switching to bare metal – 30× better cost-to-performance.
Bare metal GPUs are ideal for high-utilization workloads (10+ hours/day). If managing infrastructure feels complex, services like TechVZero handle compliance, setup, and optimization, charging only a portion of the savings achieved.
Learn how to set up and optimize bare metal GPUs to save thousands or even millions annually.
Cloud vs Bare Metal GPU Cost Comparison: 3x Savings Breakdown
Deepseek on bare metal Kubernetes with Talos Linux
sbb-itb-f9e5962
Prerequisites for Bare Metal GPU Setup
Getting the most out of bare metal GPU setups requires careful attention to hardware, software, and compliance. While these setups demand more planning than cloud instances, the payoff is clear: significantly reduced GPU costs without sacrificing performance.
Hardware Requirements
The hardware you choose directly determines both performance and cost efficiency. Here’s what you’ll need:
- GPUs: For demanding AI workloads, go with NVIDIA H100 (80GB/94GB VRAM) or H200 GPUs. For smaller tasks like inference or fine-tuning, NVIDIA L40S (48GB VRAM) or L4 GPUs are more budget-friendly options. Consumer GPUs like the RTX 4090 might work for development, but they typically lack the memory and reliability needed for production.
- CPUs: High-core-count processors are essential to prevent bottlenecks in multi-GPU setups. Consider CPUs like AMD EPYC 9454 (96 cores) or Intel Xeon Platinum 8452Y (72 cores).
- Memory: Large-scale AI tasks may demand anywhere from 512GB to over 2TB of RAM. For smaller experiments, 16GB to 32GB can suffice.
- Storage: High-speed NVMe SSDs (ranging from 1TB to over 30TB) ensure your datasets and model checkpoints load without delays.
- Networking: Multi-GPU communication benefits greatly from network speeds of 100Gbps to 300Gbps, along with PCIe Gen 5 and NVLink support.
"Bare metal GPU servers provide direct, unshared hardware access for AI workloads, resulting in superior performance, scalability, and security compared to virtual GPU servers." – RackBank
For optimal performance, tweak your BIOS settings: enable Hyperthreading, switch power settings to "High Performance", and activate Memory Mapped I/O above 4GB.
Once your hardware is ready, the next step is setting up a reliable software stack.
Software and Tools Needed
Hardware is only half the equation; the right software ensures everything runs smoothly. Start with a solid operating system like Ubuntu 22.04 or 24.04 LTS, which works well with NVIDIA drivers and Kubernetes. Disable the Nouveau driver and swap before installing the NVIDIA Data Center Driver (version 550+) and CUDA Toolkit 12.x.
For orchestration, Kubernetes (versions 1.28 to 1.30) is a strong choice. Use tools like kubeadm, kubectl, and kubelet to deploy it. The NVIDIA GPU Operator simplifies setup by automating driver installation, managing device plugins, and providing monitoring tools such as DCGM Exporter for Prometheus and Grafana integration. If you’re using Mellanox NICs, the NVIDIA Network Operator can enable GPUDirect RDMA for faster inter-node communication. Helm is a great tool for maintaining a consistent and repeatable installation process.
Compliance and Security Requirements
One of the advantages of bare metal infrastructure is its physical hardware isolation, which simplifies compliance with standards like SOC2, HIPAA, and ISO. Without a hypervisor, the attack surface is reduced, but this also means you’re fully in charge of security.
Start by configuring firewalls with UFW. Enable Intel VT-d or AMD IOMMU in your BIOS to manage device isolation. Disable Secure Boot to allow NVIDIA drivers to load kernel modules properly. For industries like finance or healthcare, bare metal’s direct hardware access lets you implement custom, hardware-level encryption for sensitive data. This not only secures your data but also helps you avoid costly security breaches.
If compliance feels daunting, companies like TechVZero can manage SOC2, HIPAA, and ISO compliance for you, so your team can stay focused on innovation instead of audits.
How to Set Up GPUs on Bare Metal
Getting GPUs up and running on bare metal involves three essential steps: provisioning servers, installing drivers, and setting up Kubernetes with GPU support. Each step is foundational, so skipping proper checks along the way can lead to headaches later.
Step 1: Provision Bare Metal GPU Servers
Start by ensuring your system detects the GPUs. Use the command:
lspci | grep -i nvidia If GPUs don’t show up, check that PCIe slots are properly seated and verify that virtualization settings like Intel VT-d or AMD IOMMU are enabled in the BIOS.
Next, update your system packages to avoid compatibility issues. Run:
sudo apt update && sudo apt upgrade -y Once your hardware is verified and your system is up to date, you’re ready to install the NVIDIA drivers and CUDA.
Step 2: Install NVIDIA Drivers and CUDA
Before installing NVIDIA’s proprietary drivers, you need to disable the open-source Nouveau driver, as it can interfere with the installation process. On Ubuntu, start by installing the required compiler tools:
sudo apt-get install build-essential Then, download the appropriate .run file for your GPU model from NVIDIA’s website. After completing the driver installation, confirm everything is functioning properly by running:
nvidia-smi Next, install the CUDA Toolkit, which enables GPU acceleration for workloads. Verify the installation with:
nvcc --version To ensure consistent performance, enable persistence mode by executing:
sudo nvidia-smi -pm 1 With the drivers and CUDA successfully installed, you’re ready to set up Kubernetes for GPU management.
Step 3: Deploy Kubernetes with GPU Support
Now that your system is equipped with the necessary drivers, you can deploy Kubernetes to manage GPU workloads. NVIDIA simplifies this process with the GPU Operator, which automates tasks like driver handling, device plugin setup, and labeling GPU resources. Add the NVIDIA Helm repository and deploy the operator using:
helm repo add nvidia https://helm.ngc.nvidia.com/nvidia "The GPU Operator allows DevOps Engineers of Kubernetes clusters to manage GPU nodes just like CPU nodes in the cluster." – NVIDIA
After deploying the GPU Operator, confirm that GPUs are recognized as schedulable resources by checking the node details:
kubectl describe node <node-name> Look for nvidia.com/gpu in the Allocatable field to ensure everything is configured correctly.
For advanced networking features, such as RDMA and GPUDirect, install the NVIDIA Network Operator. Keep in mind that installing the MOFED driver can take up to 10 minutes.
One important tip: avoid using GPU-equipped nodes as load balancers. Automatic update jobs, which often run weekly, can overwrite GPU configurations and cause downtime. To prevent this, isolate GPU workloads on dedicated nodes using appropriate scheduling policies.
How to Optimize GPU Workloads for Cost Efficiency
Getting the most out of GPU workloads can lead to 3× lower costs when using bare metal deployments. Surprisingly, most GPU-enabled Kubernetes clusters only operate at 15–25% utilization. For a 50-GPU cluster of NVIDIA H100s, that inefficiency could waste over $200,000 annually.
Job Scheduling and Resource Allocation
Standard CPU scheduling techniques don’t cut it for GPU workloads. GPU jobs require specialized schedulers that can handle different needs, like training jobs requiring exclusive access versus inference services that can share resources.
- Volcano ensures all pods in distributed training jobs start together, avoiding situations where GPUs are locked by partial jobs.
- Kueue introduces fair-share queueing and elastic quotas, helping teams avoid resource clashes.
Another game-changer is Multi-Instance GPU (MIG), which lets you divide high-end GPUs into smaller partitions. Instead of allocating an entire $30-per-hour GPU to a task that only needs 20GB of VRAM, you can run multiple smaller workloads on the same GPU. For example, one AI startup reduced its GPU fleet from 120 GPUs at 22% utilization to just 45 GPUs at 68% utilization, slashing monthly costs from $420,000 to $145,000.
Choosing the right GPU for your workload is equally important. If your model peaks at 58GB of VRAM, using an H100 with 141GB is excessive. Switching to an A100-80GB could save 45–50% in monthly expenses without sacrificing performance.
Once these adjustments are made, continuous monitoring ensures you’re staying efficient.
Monitoring GPU Performance
You can’t fix what you don’t measure. Tools like NVIDIA Data Center GPU Manager (DCGM) provide over 150 metrics per GPU, including compute utilization, memory usage, and temperature. Pairing DCGM with Prometheus and Grafana allows you to track key metrics like:
DCGM_FI_DEV_GPU_UTIL: Measures actual GPU work.DCGM_FI_DEV_FB_USED: Monitors VRAM allocation.
The gap between these metrics reveals inefficiencies. For example, high memory usage with low compute utilization means you’re paying for idle GPUs. For training workloads, set Prometheus to scrape every 5 seconds to catch short-lived spikes. For inference, a 30-second interval reduces monitoring overhead by 85%.
In November 2025, NVIDIA cut GPU waste from 5.5% to 1% by combining DCGM data with Slurm job metadata. They introduced an "Idle GPU Job Reaper" that terminated jobs with 0% compute utilization for over an hour, saving millions and freeing resources for priority tasks.
"Small inefficiencies compound quickly at scale. Once the right metrics were exposed, visibility alone drove a natural shift toward accountability." – Sachin Lakharia, Principal Software Engineer, NVIDIA
Armed with this data, the next step is maximizing GPU utilization around the clock.
How to Achieve 24/7 GPU Utilization
Horizontal Pod Autoscaling (HPA) can help maintain 70% GPU utilization by scaling resources during low-traffic periods. Use a conservative scale-down stabilization period of around 5 minutes to avoid unnecessary thrashing.
For workloads with predictable traffic, schedule-based autoscaling is effective. Scaling down inference replicas during off-hours (e.g., 6 PM to 8 AM) can cut daily GPU usage by 58–63%. One enterprise ML platform transitioned from 200 on-demand GPUs without checkpointing to a hybrid model of 75 on-demand GPUs and 125 spot GPUs. By adding automated CRIU checkpointing, they boosted utilization from 19% to 74% and reduced monthly costs from $720,000 to $220,000.
Checkpoint/Restore (CRIU) is especially useful for training jobs. Without it, interruptions can increase costs by 83%. CUDA checkpointing allows jobs to resume from their last state, making it feasible to use spot instances – which are 60–80% cheaper than on-demand instances – without risking lost progress.
Batching workloads is another way to improve efficiency. By processing large volumes asynchronously, you can hit 60–90% utilization. For research or development workloads, set idle timeouts to reclaim GPUs sitting under 5% utilization for more than a week.
| Workload Type | Target Utilization | Optimization Strategy |
|---|---|---|
| Training | 70–95% | Checkpoint/Restore, Spot Instances |
| Real-Time Inference | 20–40% | HPA, MIG, Right-sizing |
| Batch Inference | 60–90% | Large batching, Off-peak scheduling |
| Research/Dev | 10–15% | Idle timeouts, Shared GPU pools |
How to Measure and Maintain 3× Cost Savings
After fine-tuning your GPU workloads, the next step is to measure and audit your savings. Achieving 3× cost savings with bare metal GPUs demands careful tracking and regular checks. Without these, inefficiencies can creep back in.
How to Calculate Cost Savings
Start with a Total Cost of Ownership (TCO) analysis, which includes upfront capital expenses (CapEx), ongoing operational expenses (OpEx), and hidden costs.
The formula for TCO is: (Hardware + System Cost) ÷ (Monthly Cloud Cost minus Electricity). For example, an 8-GPU NVIDIA H100 system costs approximately $240,000, with total infrastructure expenses – including power, cooling, and networking – reaching about $500,000.
Now, compare this to cloud pricing. H100 instances range from $1.49/hour on budget providers to $4.60–$10/hour on major platforms. At an average rate of $2.85/hour, continuous usage costs roughly $20,520 per month or $246,240 annually. With a bare metal setup running at 70% utilization or higher, you can break even in 7–12 months.
Don’t forget to account for additional costs:
- Power consumption: A single 40kW GPU rack averages $35,000 per year for electricity and cooling.
- Maintenance: Plan for about 5% of hardware costs annually.
- Staffing: System administration costs around $10,000 per server annually.
- Data egress fees: For example, transferring 1PB of training data could cost $92,000 with major cloud providers.
Utilization is key. At 40% utilization, bare metal setups can be 25% cheaper than cloud, but if utilization drops to 8%, costs can quadruple. As discussed earlier, keeping GPU usage high is critical for maximizing savings.
Real-world examples back up these calculations.
Case Study: $331,000 Saved with Bare Metal GPUs
In January 2026, a client moved a 10-node cluster (each with 2× NVIDIA L4 GPUs) from a cloud-managed Kubernetes setup to a self-hosted bare metal system. Monthly costs fell from $42,000 to $14,500, resulting in annual savings of $331,000, all while maintaining 99.99% uptime.
This client’s workload ran over 18 hours daily, well above the utilization threshold for bare metal efficiency. Over three years, total savings reached $993,000.
Another example involves a financial services firm training fraud detection models. By investing $1.2 million in a 32-GPU on-premise cluster, they cut their monthly AWS bill from $180,000 to $30,000. The infrastructure paid for itself in just eight months.
"Cloud becomes expensive above 40% utilization. Organizations running GPUs more than 10 hours daily save money with on-premise infrastructure." – Introl
To maintain these savings, regular audits are essential.
Quarterly Audits for Continued Optimization
Quarterly audits are crucial to ensure your cost advantage doesn’t erode. Focus on three main areas: utilization, hardware lifecycle, and market benchmarking.
- Monitor GPU utilization closely. Idle or underused resources can make up 32% of cloud waste. If average daily usage falls below 4–6 hours, renting GPUs on marketplaces might be more cost-effective. Tools like DCGM and Prometheus can help identify underutilized GPUs.
- Assess hardware depreciation. GPUs lose 30–40% of their value within the first year. Regular reviews can help decide when to replace or retire aging equipment before maintenance costs rise.
- Compare internal costs to cloud rates. For example, AWS recently raised prices by about 15%, which could make owning hardware more appealing. However, falling cloud prices or new GPU models might shift the balance. Platforms like vast.ai or Lambda Labs can provide up-to-date benchmarks.
"To beat the cloud on cost, dedicated equipment must be sweated – that is, used to its fullest potential – to obtain a maximum return on investment." – Dr. Owen Rogers, Senior Research Director for Cloud Computing, Uptime Institute
Automating anomaly detection can help spot usage spikes or budget issues in real time. Additionally, lifecycle management policies can move older data to cheaper storage tiers, helping you sustain your 3× cost savings over the long term.
Conclusion: Getting Started with Bare Metal GPUs
Bare metal GPU infrastructure can cut costs by up to 3×, thanks to the elimination of virtualization overhead and data egress fees. Plus, it offers direct hardware control. For example, running a 10-node cluster can lead to considerable savings while still delivering reliable performance, such as 99.99% uptime.
To get the most out of this setup, focus on optimizing hardware usage, keeping a close eye on GPU performance, and performing regular audits to maintain cost efficiency over time.
"The AI industry is entering a new phase where inference efficiency, not model size, determines market winners." – Aethir
Start by evaluating your current workload needs. Profile your workload by measuring metrics like tokens per second and latency requirements. This helps you select the right hardware tier. For instance, H100 GPUs are ideal for applications needing sub-100ms latency, while L4 GPUs work well for latency targets in the 1–2 second range. This step ensures a targeted and cost-effective bare metal deployment.
TechVZero simplifies this process with performance-based pricing. You pay 25% of the savings for one year – and nothing if the cost reduction floor isn’t met. They take care of everything, from technical setup and security compliance to ongoing optimization, so you can focus on your core product instead of managing infrastructure. By taking these steps, you can unlock the full potential of bare metal GPUs and achieve long-term cost efficiency.
FAQs
When does bare metal beat cloud on cost?
When usage remains consistently high, bare metal servers can outshine cloud costs. The upfront investment and ongoing expenses of dedicated hardware start to pay off after about 7 to 12 months of continuous operation. Of course, this timeline depends on factors like workload intensity and how efficiently the hardware is managed.
What’s the simplest way to run GPUs on Kubernetes?
Running GPUs on Kubernetes becomes straightforward with the NVIDIA GPU Operator. This tool takes care of GPU resource management on bare metal clusters, handling everything from drivers to plugins and monitoring tools.
To get started, you’ll need to prepare your Kubernetes environment, install the NVIDIA GPU Operator, and deploy GPU-enabled workloads. This method reduces the need for manual setup while ensuring your GPUs are supported efficiently and perform at their best.
How do I keep GPU utilization high 24/7?
To keep your GPU running at full capacity around the clock, it’s important to monitor its usage closely. Look for idle times and adjust workloads accordingly. Tools that track GPU utilization can help you identify patterns and fine-tune scheduling to avoid downtime.
Using bare metal GPU servers is another way to boost performance. They eliminate unnecessary overhead by giving you complete control over the hardware. Additionally, reserving servers for extended periods and automating workload distribution can help maintain consistent usage, reducing the chances of underutilization.