Reserved Instances for Kubernetes: Mapping Commitments to Node Pools

Running Kubernetes workloads can get expensive, but Reserved Instances (RIs) offer savings of up to 75% compared to on-demand pricing. The challenge? Kubernetes doesn’t automatically align workloads with RIs, which can lead to wasted capacity and double payments. To fix this, map RIs to specific node pools using tools like nodeSelector and proper labeling. Steady workloads – like databases and APIs – should run on reserved capacity, while variable workloads can use on-demand or spot instances.
Here’s a quick breakdown of how to optimize RI usage with Kubernetes:
- Analyze Workloads: Separate steady workloads (consistent usage) from variable ones (fluctuating demand).
- Purchase Smartly: Match RIs to node pool instance types and regions.
- Tag and Configure: Label nodes and use Kubernetes features to schedule workloads on RI-backed nodes.
- Monitor Usage: Use tools like Prometheus, Kubecost, and Karpenter to track and optimize RI utilization.
Kubernetes Instance Types Comparison: Reserved vs Spot vs On-Demand
Reserved Instances and Kubernetes: The Basics

What Are Reserved Instances?
Reserved Instances (RIs) are a way to save on cloud costs by committing to a specific amount of compute capacity with AWS, Azure, or Google Cloud for one or three years. By doing so, you can cut costs by as much as 75% compared to pay-as-you-go pricing.
There are two main types of RIs: Standard RIs, which offer the highest discounts but limit flexibility in changing configurations, and Convertible RIs, which allow you to swap instance types, albeit with slightly lower savings.
Unlike On-Demand Instances, which are billed by usage without any commitment, or Spot Instances, which offer steep discounts but can be interrupted, RIs provide a balance of guaranteed capacity and predictable pricing. This makes them perfect for workloads that run consistently, such as backend APIs, databases, or core services.
How Reserved Instances Work with Kubernetes
Reserved Instances operate at the billing level, which means they aren’t directly tied to Kubernetes. When you purchase an RI, you specify details like the instance family, size, region, and availability zone. The cloud provider then applies the discount automatically to any matching instances running in your account.
However, Kubernetes itself doesn’t recognize whether a node is backed by an RI. You’ll need to manually configure your node pools to match the specifications of your RIs. This involves ensuring the node pools use the same instance types, sizes, and regions as your reservations.
Once the node pools are aligned, you can label nodes (e.g., instanceType=reserved) and use Kubernetes features like nodeSelector to route steady-state workloads to RI-backed nodes. This setup ensures that your workloads take full advantage of the reserved capacity.
Why Map Reserved Instances to Node Pools
Properly aligning RIs with Kubernetes node pools is key to keeping costs predictable and avoiding unnecessary expenses.
Here’s how mapping RIs to node pools benefits you:
- Lower Costs: By running baseline workloads on reserved capacity, you can cut compute costs by 70% to 75% compared to on-demand pricing. A common approach is to cover about 70% of your compute and memory needs with RIs and use on-demand or spot instances to manage traffic spikes.
- Consistent Pricing: With fixed monthly costs for your reserved capacity, surprise bills from unexpected on-demand usage become a thing of the past.
- Avoiding Waste: Routing steady-state services to RI-backed nodes prevents situations where reserved capacity goes unused while you’re paying for on-demand instances.
By carefully mapping RIs to your Kubernetes node pools, you can strike the right balance between cost savings and resource efficiency.
| Feature | On-Demand Instances | Reserved Instances | Spot Instances |
|---|---|---|---|
| Pricing | Highest (standard rate) | Up to 75% discount | Up to 90% discount |
| Commitment | None (pay-as-you-go) | 1 or 3 years | None |
| Availability | High | Guaranteed capacity | Low (can be reclaimed) |
| Best Use Case | Unpredictable spikes | Steady-state, 24/7 workloads | Batch jobs, fault-tolerant tasks |
sbb-itb-f9e5962
How to Analyze Node Pool Usage Patterns
Measuring Node Pool Resource Usage
Before diving into Reserved Instances (RIs), start by evaluating your node pool’s resource consumption. Focus on three key metrics: used, requested, and allocatable resources. These figures help pinpoint capacity gaps. For instance, if there’s a large gap between requested and used resources, it might indicate wasted capacity that needs addressing before committing to RIs.
To get an accurate picture, review 30–90 days of historical data. This timeframe smooths out temporary spikes and highlights your baseline needs. Tools like GKE Usage Metering or Prometheus can assist in gathering this data. GKE Usage Metering exports resource consumption data to BigQuery, making it easier to analyze long-term patterns.
"GKE usage metering tracks information about the resource requests and actual resource usage of your cluster’s workloads… identifying workloads whose resource requests differ significantly from their actual resource consumption." – Google Cloud Documentation
When calculating your baseline, don’t forget to include system overhead. GKE reserves memory based on a tiered scale:
- 25% of the first 4 GiB
- 20% of the next 4 GiB
- 10% of the next 8 GiB
- 6% of the next 112 GiB
- 2% of any memory above 128 GiB
- Plus, an additional 100 MiB for pod eviction.
For CPU, the reservation starts at 6% for the first core and gradually decreases to 0.25% for cores beyond four.
This detailed analysis follows Kubernetes best practices and lays the groundwork for understanding workload types.
Steady vs. Variable Workloads
Not all workloads are a match for Reserved Instances. Begin by separating steady-state workloads from variable workloads.
- Steady-state workloads: These include backend APIs, databases, or other core services. They show consistent resource usage, typically averaging over 80% utilization across 30 days. These workloads are prime candidates for RIs.
- Variable workloads: These workloads fluctuate significantly, often with average utilization between 7% and 20% over 30 days in overprovisioned clusters. Examples include traffic-driven services, batch jobs, and development environments. Unless these workloads are rightsized, they may not be suitable for RIs.
To differentiate, use the actual-to-request ratio. Steady workloads maintain high, consistent ratios, making them ideal for Reserved Instances. On the other hand, variable workloads with inconsistent patterns should be carefully assessed before committing to long-term resources.
How to Match Reserved Instances to Node Pools
Selecting Instance Types for Node Pools
Once you’ve identified the workloads in your node pools, the next step is to align these with the right instance types to maximize Reserved Instance (RI) benefits. For steady workloads – like CRM systems or backend batch processing – that require consistent resources, RIs are a great fit. For example, if your database node pool regularly runs on m5.large instances, these should be your target for RI purchases.
For workloads that rely on specific hardware, such as AI training requiring GPUs like NVIDIA H100 or L4, create dedicated node pools. Use node selectors to ensure these jobs are routed to the reserved capacity. Additionally, Graviton processors stand out as a cost-effective choice, offering 20% lower costs and 60% better energy efficiency compared to x86-based instances, making them ideal for long-term commitments.
To avoid wasting resources, leverage tools like Goldilocks, KRR, or Kubecost. These can help fine-tune your resource requests, addressing the issue of overprovisioning – a problem that contributes to 30% of cloud spend waste.
Lastly, use node labeling and configure autoscaler priorities to ensure workloads are routed to RI-backed nodes first. After aligning your technical requirements, evaluate the RI commitment model that best suits your workload’s flexibility and cost goals.
Standard RIs vs. Convertible RIs vs. Savings Plans
Different commitment models cater to different needs, and understanding their nuances can help you make smarter purchasing decisions.
- Standard RIs: These offer the deepest discounts – up to 72-75% – but come with strict restrictions. They lock you into specific instance families, regions, and sizes, making them ideal for stable node pools running critical system services.
- Convertible RIs: While the discounts are slightly lower (around 66%), these allow you to exchange them for different instance families, sizes, or operating systems. If you foresee upgrading from older to newer instance types – like moving from m5 to m6i – this option provides flexibility during the commitment period.
- Savings Plans: These are the most adaptable. Compute Savings Plans automatically apply to various instance families, regions, and even services like Fargate and Lambda, with discounts up to 66%. On the other hand, EC2 Instance Savings Plans offer higher discounts – up to 72% – but are limited to a specific instance family within one region.
"Savings Plans offer flexibility for dynamic workloads and autoscaled clusters by covering a broad range of instance types, while RIs provide deeper discounts for stable, predictable environments."
– Hari Chandrasekhar, Content Writer, Sedai
| Feature | Standard RIs | Convertible RIs | Compute Savings Plans |
|---|---|---|---|
| Max Discount | Up to 72-75% | Up to 66% | Up to 66% |
| Flexibility | Fixed family, region, and size | Can change family, size, or OS | Flexible across families, regions, and services |
| Best for K8s | Stable system nodes | Long-term architecture migrations | Dynamic clusters with frequent autoscaling |
| Capacity Guarantee | Yes (if zonal) | No | No |
| Can Resell | Yes (marketplace) | No | No |
A hybrid approach often works best. Use Standard RIs or EC2 Instance Savings Plans to cover baseline node pools that run consistently. Then, apply Compute Savings Plans to elastic node pools that scale frequently or use mixed instance families. This strategy creates a balance, allowing you to integrate RIs with on-demand and spot instances for maximum cost efficiency.
How to Avoid Overcommitment and Underutilization
Combining RIs with On-Demand and Spot Instances
Think of Reserved Instances (RIs) as the foundation for your steady-state workloads. By matching RI-node pools, you can ensure predictable workloads use reserved capacity while flexible workloads tap into additional savings. RIs or Savings Plans are ideal for production databases, core application servers, and other 24/7 services. To handle everything else, layer in on-demand and spot instances for cost efficiency.
Spot instances, which can save you up to 90%, are perfect for stateless tasks like CI/CD pipelines, batch processing, and AI training. However, AWS can reclaim spot capacity with just a two-minute warning, so your workloads must be interruption-tolerant.
On-demand instances bridge the gap for unpredictable spikes, short-term projects, or bursts that exceed your pre-purchased commitments. This three-tier setup helps avoid over-purchasing RIs while ensuring you don’t waste money.
One important note: Kubernetes autoscalers like Karpenter don’t automatically prioritize RIs. To address this, manually configure NodePools to favor RI-compatible instance types. Use NodePool weights in Karpenter to assign higher priority to RI-compatible nodes, ensuring they’re used before the autoscaler adds spot or on-demand instances. For spot configurations, diversify across multiple instance families to reduce the risk of capacity shortages in any single pool.
Autoscaling Tools for Better Efficiency
Once you’ve matched your instance types, optimizing autoscaling can further improve RI usage and reduce costs. Many Kubernetes clusters operate at less than 50% average resource utilization, meaning companies often pay far more than necessary for infrastructure. Strategic use of autoscaling tools can help close this gap.
Start with the Vertical Pod Autoscaler (VPA) to adjust container resource requests based on actual usage. Studies show that only 13% of requested CPU is typically used in Kubernetes clusters. Run VPA in "Recommendation" mode to gather data without causing pod restarts. Once validated, apply the recommendations to align resource requests with actual needs.
Next, use the Horizontal Pod Autoscaler (HPA) to manage replica counts during traffic spikes. This approach keeps your RI-backed baseline steady while scaling out to on-demand or spot instances for peak loads. Just be cautious: avoid running HPA and VPA on the same resource metric to prevent conflicting policies.
At the node level, configure the Cluster Autoscaler Priority Expander to favor RI-backed nodes over on-demand capacity. You can set priority scores (e.g., 50 for reserved, 10 for on-demand) in a ConfigMap to ensure RIs are utilized first.
For advanced setups, enable consolidation in Karpenter. This feature continuously evaluates and reorganizes workloads, moving pods to fewer, better-sized nodes to maximize RI usage. It’s particularly useful for reducing fragmentation in your cluster.
For example, in early 2026, UK-based financial services company Bud adopted automated workload autoscaling with Cast AI. By dynamically adjusting resource requests and limits, they achieved 93% CPU and memory utilization, significantly narrowing the gap between requested and provisioned resources.
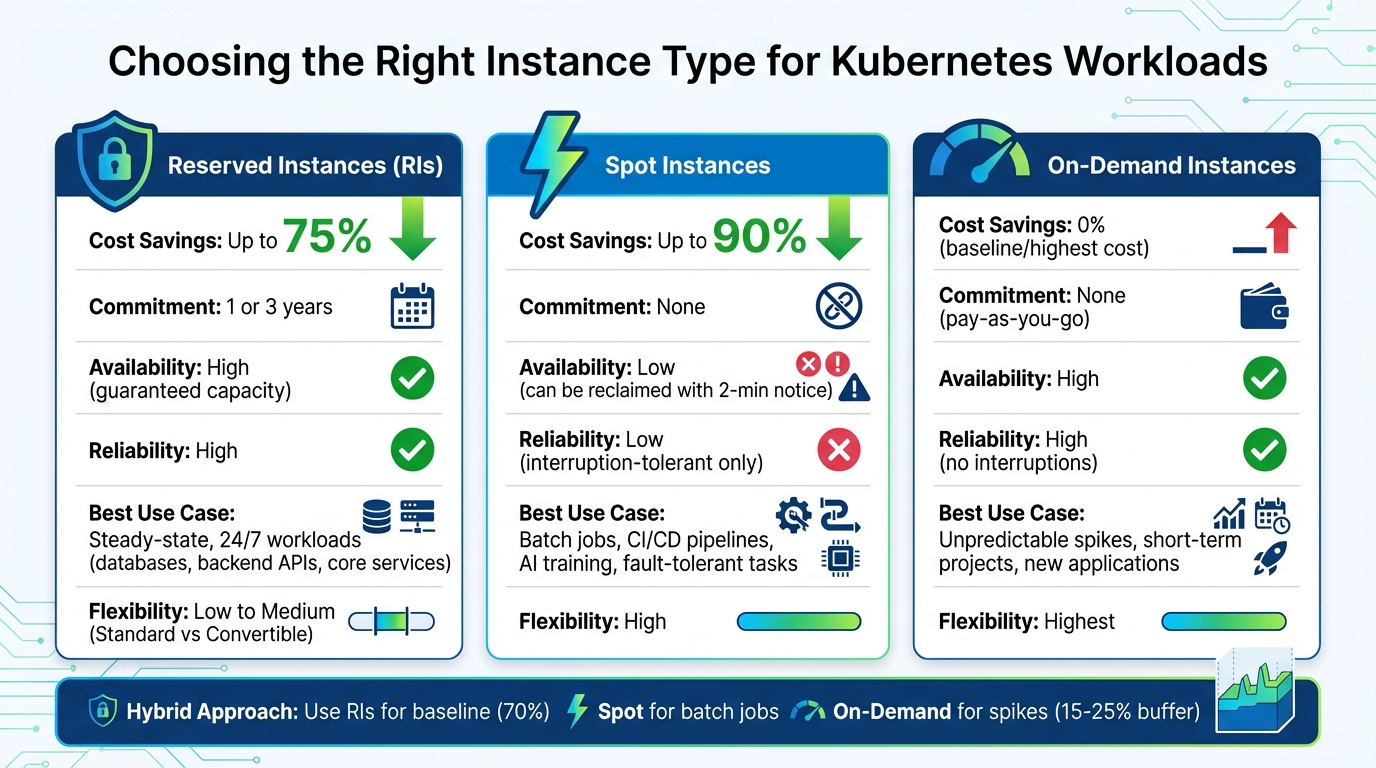
RI vs. Spot vs. On-Demand: Comparison
Knowing when to use each instance type is essential for building a cost-effective and resilient cluster. Here’s a quick comparison:
| Feature | Reserved Instances | Spot Instances | On-Demand Instances |
|---|---|---|---|
| Cost Savings | Up to 75% | Up to 90% | 0% (Baseline) |
| Reliability | High (committed capacity) | Low (2-min termination notice) | High (no interruptions) |
| Best K8s Use Case | Steady-state workloads | Fault-tolerant batch jobs, dev/test | Unpredictable spikes, new apps |
| Commitment | 1 or 3 years | None | None |
| Capacity Guarantee | Yes (if zonal) | No | No |
RIs offer the best discounts but come with long-term commitments to specific instance families and regions. Spot instances deliver the most savings but require workloads that can handle interruptions. On-demand instances, while the most flexible, are also the most expensive.
To optimize costs, assign RIs to workloads like production database node pools that run continuously, use spot instances for tasks like nightly ETL jobs, and reserve on-demand instances for unexpected traffic spikes. Always maintain a 15–25% buffer for critical workloads to handle sudden surges faster than the autoscaler can respond.
Next, we’ll outline a step-by-step process for aligning RIs with node pools.
Scaling Your Kubernetes Clusters Without Going Broke
Step-by-Step: Mapping Reserved Instances to Node Pools
To map Reserved Instances (RIs) effectively to your node pools, follow this three-step process. It ensures you make the right commitments, minimize wasted capacity, and maintain clear visibility into how your RIs are utilized.
Step 1: Tag Node Pools by Workload Type
Start by labeling your node pools with metadata that reflects their workload type. These labels flow through to your billing system, making it easier to allocate RI costs to teams, environments, or applications.
Use straightforward and standardized labels like environment:production, team:research, or component:frontend. For instance, if you have a CRM system running 24/7, label the node pool with workload:steady-state to identify it as ideal for RI coverage. You can apply labels using the CLI:
gcloud container node-pools update [NODE_POOL_NAME] --cluster=[CLUSTER_NAME] --labels=[KEY]=[VALUE].
"Labeling these nodes helps the Kubernetes scheduler identify and prefer these nodes for running pods." – DavidW (skyDragon), Cloud-Native Engineer, overcast blog
Avoid using high-cardinality labels, like timestamps, as they can complicate billing and reporting. GKE allows up to 64 cluster labels per resource, giving you plenty of flexibility to organize by cost center, function, or compliance needs. Once your nodes are labeled, use nodeSelector in your Pod manifests to ensure steady-state workloads are scheduled on "reserved" nodes, maximizing RI usage.
With your node pools tagged, you’re ready to purchase RIs tailored to your steady workloads.
Step 2: Purchase Reserved Instances
Analyze your baseline usage with tools like Prometheus. Focus on workloads with consistent, predictable demand, such as production databases or backend batch jobs. These are ideal for one- or three-year RI commitments.
When purchasing RIs, match them to the specific instance families (e.g., AWS m7i, Azure D-series) used in your tagged node pools. This ensures the discounts are applied correctly. Be mindful of regional alignment – RIs purchased in us-east-1 won’t cover workloads running in us-west-2. Double-check your cluster’s region and availability zones before committing. Opting for three-year terms can save up to 75%.
Once you’ve purchased RIs, label the nodes using:
kubectl label nodes <node-name> instanceType=reserved
This helps the Kubernetes scheduler and monitoring tools track which nodes are consuming reserved capacity. To further optimize, configure the cluster autoscaler with the least-waste expander. This setting prioritizes using reserved capacity before provisioning new on-demand nodes.
After purchasing and labeling, keep an eye on utilization to adjust your commitments as needed.
Step 3: Monitor and Adjust RI Coverage
Regular monitoring is crucial to ensure your RIs are fully utilized. Check node metadata every five minutes and RI usage hourly to identify imbalances quickly. Enable GKE cost allocation to export cluster and namespace details to your billing data, allowing you to analyze RI usage by workload.
"Optimization actions are performed at the intersection of sub-optimal commitments and usage we manage." – nOps
If you find unused RIs in one region, remember they can’t be applied to workloads in another. Address this by creating high-priority Karpenter NodePools that target instance families with surplus RIs. Use the "Use As Base" feature in node pool templates to prioritize On-Demand capacity over Spot instances when RIs are underutilized.
This monitoring complements earlier autoscaling strategies, ensuring your reserved capacity is used efficiently. Revisit your RI strategy periodically as workloads evolve. If your cluster grows, you may need to buy additional RIs or shift variable workloads to Spot instances to maintain cost efficiency.
Tools for Monitoring and Optimization
Once you’ve mapped Reserved Instances (RIs) to your node pools, the next step is keeping track of how effectively you’re using them. The goal is to monitor the gap between three key metrics: what you’re paying for (reserved capacity), what you’re requesting (pod resource requests), and what you’re actually using (real consumption). Here’s a breakdown of tools that can help you monitor and optimize RI usage at both node and pod levels.
Tracking Node and Pod Utilization
groundcover uses eBPF sensors to gather detailed data at the kernel level – covering CPU, memory, disk, and network – without the performance overhead that traditional monitoring agents often bring. It helps pinpoint underutilized RIs by comparing container resource requests and limits against actual usage. According to groundcover:
"proprietary eBPF sensor leverages all its innovative powers to collect comprehensive data across your cloud environments without the burden of performance overhead".
By default, the tool retains logs for seven days, but this can be adjusted in the VictoriaMetrics database.
Kubecost adds cost transparency by integrating billing APIs to map in-cluster usage to cloud spending. It calculates resource allocation using the time-weighted maximum of requests and usage over a specific period. Kubecost is open-source and available under the Apache2 license.
Anodot (Umbrella) focuses on identifying "waste" at both the pod and node levels. Waste at the pod level occurs when usage is less than requested, while node-level waste happens when total pod usage is lower than node capacity. As Anodot explains:
"All resources that are not in use (CPU, memory, etc.) are considered to be waste. There is a waste at the pod level (when usage is smaller than requested), and also waste at the node level".
For GKE users, enabling GKE Cost Allocation lets you track kube:unallocated resources – capacity you’re paying for but not assigning to workloads. It also monitors kube:system-overhead, which accounts for resources used by Kubernetes itself (like kubelet and kube-proxy). Keep in mind that cost allocation data may take up to three days to appear in Cloud Billing after activation.
Using Helm Charts for Resource Quotas
Monitoring usage is only part of the equation; enforcing resource quotas is another critical step for controlling costs. Helm charts can automate the deployment of ResourceQuota and LimitRange objects across namespaces, ensuring consistent resource governance in multi-tenant environments.
ResourceQuota: Sets hard limits for CPU, memory, storage, and pod counts within a namespace, preventing any single team from overusing reserved capacity.LimitRange: Enforces default requests and limits for individual containers, ensuring pods meet the quota system’s requirements. Without these values, pods may be rejected.
In January 2026, OneUptime demonstrated how to deploy Kubecost, Vertical Pod Autoscaler (VPA), and Karpenter using Helm. They introduced a "ResourceQuota Template" that allowed teams to parameterize requests.cpu and limits.memory through Helm values. This approach, combined with Karpenter for node autoscaling and VPA for right-sizing, aimed to reduce resource waste by 20-40% by aligning pod requests with actual node pool capacity.
To avoid pod rejections due to missing resource definitions, bundle both ResourceQuota and LimitRange in your Helm templates. Use Helm’s values.yaml file to adjust quotas for different environments – for example, setting higher limits for production compared to development or staging. Tools like Goldilocks, deployed via Helm, can identify over-provisioned namespaces and recommend adjustments based on actual pod behavior. By combining real-time monitoring with automated quota enforcement, you can make the most of your Reserved Instances.
Conclusion
Mapping Reserved Instances (RIs) to Kubernetes node pools isn’t just about saving money – it’s about creating a scalable and efficient cost structure. By aligning node pool usage with the right RI commitments, you can significantly cut down on wasted capacity. For example, CloudBolt reports that Kubernetes clusters often run 30–60% higher in costs than necessary due to overprovisioning and poor scheduling. Proper mapping helps directly address this issue, slashing unnecessary expenses.
For SaaS and AI companies experiencing growth, a hybrid strategy tends to work best. Cover your baseline needs with RIs, leverage Spot instances for batch jobs and AI training tasks that can tolerate interruptions, and keep On-Demand instances as a buffer for unexpected traffic spikes. This combination not only ensures operational efficiency but also enables savings of up to 75% on predictable workloads. At the same time, it retains the flexibility to handle variable demand without locking you into overcommitments.
Effective RI management requires ongoing effort. Label your reserved nodes, use nodeSelectors to direct steady-state pods to discounted capacity, and rely on tools like Karpenter or the Cluster Autoscaler to prioritize RIs during scaling events. These tools simplify the process, ensuring your Kubernetes clusters make the most of reserved capacity. As Sushant Gulati, Sr. Engineering Manager at BigBasket, shared:
"We cut our costs in half and now have full coverage in prod, dev, and testing environments where we previously had to limit it due to cost concerns".
While cost savings are a major driver, uninterrupted performance is equally vital. Unlike Spot instances, which can be interrupted mid-task, RIs offer predictable and uninterrupted capacity. This makes them indispensable for mission-critical services. For AI workloads requiring GPUs or TPUs, capacity reservations ensure access to specialized, high-demand hardware, which is crucial when such resources are scarce.
The key to sustainable cloud cost management lies in continuously analyzing usage patterns, aligning commitments, and monitoring regularly. Just as earlier sections emphasized the importance of ongoing adjustments, your RI strategy should adapt as your needs evolve. This ensures you’re always paying for exactly what you use – and using exactly what you’ve paid for.
FAQs
How can I align my Kubernetes workloads with Reserved Instances to avoid wasted resources?
To make the most of Reserved Instances (RIs) for your Kubernetes workloads and cut down on wasted resources, start by studying your node pool usage patterns. Look closely at the instance types, regions, and availability zones your workloads rely on the most. Then, purchase RIs that align with these specific needs.
You can take it a step further by assigning certain node pools to use this reserved capacity. Focus on node pools that have steady, predictable workload demands, and configure them to match your RI commitments. This approach helps you avoid overcommitting or leaving your reservations underused.
Keep an eye on your usage data regularly and adjust your reservations when necessary. Actively managing your RI commitments ensures your workloads stay cost-effective without sacrificing performance or flexibility.
What are the best tools for monitoring and optimizing Reserved Instances in Kubernetes?
To keep tabs on and fine-tune Reserved Instances (RIs) in Kubernetes, there are several tools designed to simplify cost management and resource allocation.
One standout option is Kubecost, which provides in-depth insights into Kubernetes spending and resource usage. It breaks down costs in real time across services, deployments, namespaces, and containers. Plus, it integrates seamlessly with cloud billing APIs from providers like AWS, Azure, and GCP. If you’re running on-premises clusters, no problem – Kubecost supports hybrid environments too.
Another useful tool is Sysdig Cost Advisor, which focuses on identifying unused resources and offering practical recommendations to cut costs. It’s particularly helpful for managing multi-cloud Kubernetes setups efficiently.
For those using Google Cloud, native features like capacity reservations and monitoring tools can track resource usage and improve RI utilization. These built-in tools help align commitments with actual demand, reducing unnecessary spending while ensuring performance stays on point.
Lastly, nOps is worth considering for broader commitment tracking. It monitors RI usage and helps optimize underused or overcommitted instances, ensuring resources are better aligned with workload needs.
What’s the difference between Standard Reserved Instances, Convertible Reserved Instances, and Savings Plans for Kubernetes workloads?
The differences between Standard Reserved Instances (RIs), Convertible Reserved Instances, and Savings Plans for Kubernetes workloads boil down to how much flexibility, savings, and commitment each option provides.
Standard Reserved Instances offer the deepest discounts – up to 75% – but come with strict requirements. You lock in the instance type, size, region, and tenancy for either a 1- or 3-year term. These work best for workloads that are steady and predictable.
Convertible Reserved Instances provide slightly lower savings, with discounts reaching up to 66%. However, they allow you to adjust instance attributes during the term, making them a better fit for workloads that might change over time.
Savings Plans take a different approach by focusing on flexibility. Instead of locking in specific configurations, you commit to a dollar-per-hour spend. This applies across instance types, regions, and even services like Fargate and Lambda, with discounts of up to 72%. This makes them ideal for Kubernetes environments that are dynamic or less predictable.
Each option serves a specific need: Standard RIs maximize savings for stable workloads, Convertible RIs provide a balance of savings and adaptability, and Savings Plans suit environments requiring greater flexibility.