Kubernetes RBAC: Step-by-Step Setup

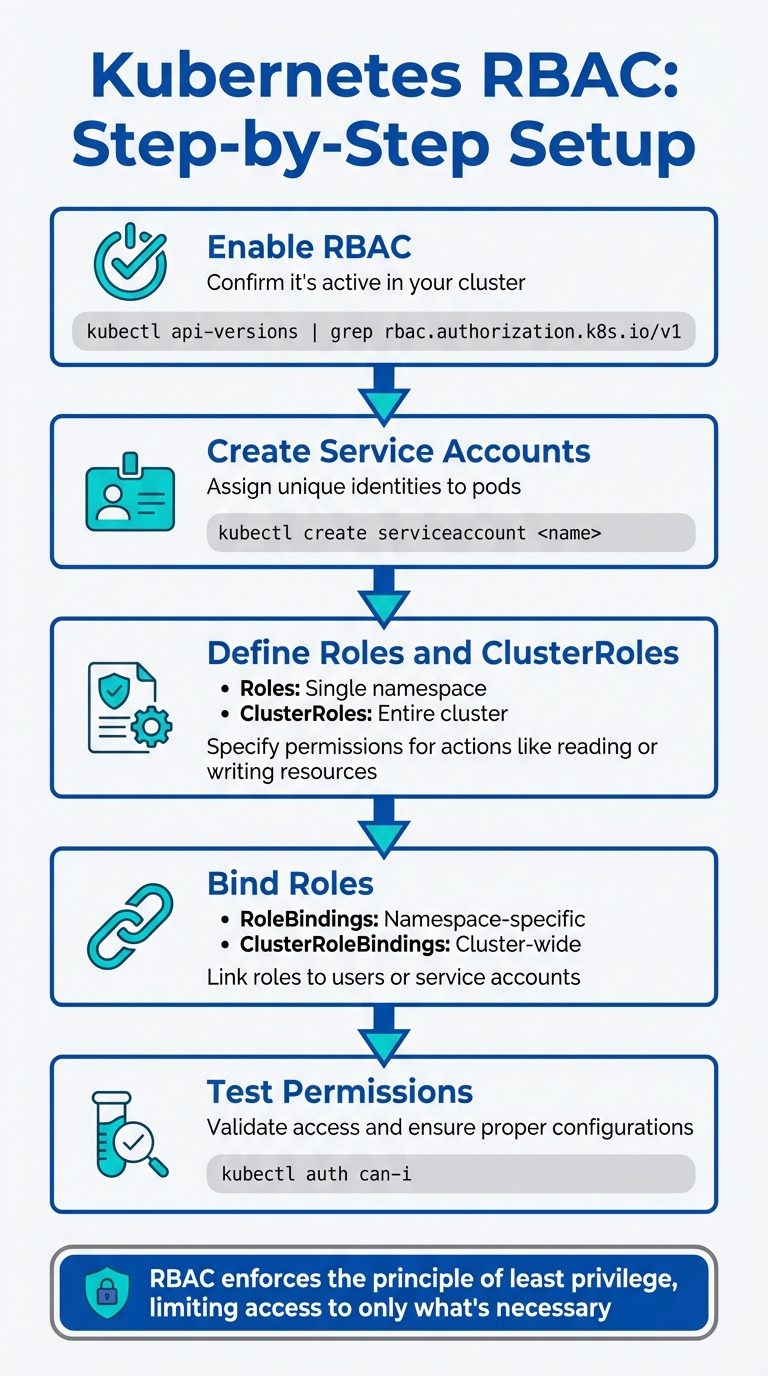
Kubernetes Role-Based Access Control (RBAC) ensures secure access to your cluster by assigning specific permissions to users, groups, or service accounts. It enforces the principle of least privilege, limiting access to only what’s necessary. Here’s a quick overview of how to set up RBAC:
- Enable RBAC: Confirm it’s active in your cluster (
kubectl api-versions | grep rbac.authorization.k8s.io/v1). - Create Service Accounts: Assign unique identities to pods using
kubectl create serviceaccount <name>. - Define Roles and ClusterRoles: Specify permissions for actions like reading or writing resources.
- Roles: Apply to a single namespace.
- ClusterRoles: Apply across the entire cluster.
- Bind Roles: Use RoleBindings (namespace-specific) or ClusterRoleBindings (cluster-wide) to link roles to users or service accounts.
- Test Permissions: Use
kubectl auth can-ito validate access and ensure proper configurations.
RBAC is critical for securing Kubernetes clusters, preventing unauthorized access, and minimizing risks from compromised credentials. Avoid over-permissive roles, use namespace-specific bindings, and regularly audit your configurations to maintain a secure environment.
5-Step Kubernetes RBAC Setup Process
Setting Up Kubernetes RBAC
Enable RBAC in Your Kubernetes Cluster
If you’re using a managed cluster like Amazon EKS, Google GKE, or Microsoft AKS, RBAC is already enabled by default. For self-managed clusters, you’ll need to explicitly enable it. Start your Kubernetes API server with the --authorization-mode flag set to include RBAC, like this:
--authorization-mode=Node,RBAC Alternatively, you can use the --authorization-config option with an RBAC-enabled configuration file. To confirm that RBAC is properly set up, run this command:
kubectl api-versions | grep rbac.authorization.k8s.io/v1 If the API version appears in the output, your cluster is ready to start defining roles and permissions.
Create Service Accounts
With RBAC enabled, you can assign unique identities to pods through service accounts. To create a service account, use:
kubectl create serviceaccount <name> For Kubernetes versions 1.22 and newer, the TokenRequest API is used to generate temporary tokens. You can create a token for a service account with:
kubectl create token <name> To ensure a pod uses a specific service account, set the spec.serviceAccountName field in the pod’s manifest file. If you don’t specify this field, Kubernetes will automatically assign the default service account for the namespace. For better security, disable automatic token mounting by adding automountServiceAccountToken: false to your ServiceAccount or Pod specification if your application doesn’t need to interact with the API server.
Define Roles and ClusterRoles
Once service accounts are ready, the next step is defining what actions they are allowed to perform. This is where Roles and ClusterRoles come in:
- Roles: These are tied to a specific namespace and require namespace information in their metadata. They’re used for namespaced resources like Pods or Services.
- ClusterRoles: These apply across the entire cluster and are used for cluster-scoped resources such as Nodes or PersistentVolumes, as well as non-resource endpoints like
/healthz.
Permissions for both Roles and ClusterRoles are defined using three key fields: apiGroups, resources, and verbs. For example, verbs can include actions like get, list, watch, create, update, patch, and delete. The core API group is represented by an empty string (""). For subresources, such as pod logs, include the subresource name with a slash (e.g., pods/log). Avoid using * for resources or verbs in production to prevent over-permissioning.
When applying RBAC configurations, it’s better to use:
kubectl auth reconcile -f <file> This command is smarter than kubectl apply because it merges rules and subjects accurately, ensuring your RBAC definitions are applied correctly. By carefully defining these roles, you can enforce least-privilege access and maintain a secure environment.
Binding Roles and Testing Permissions
RoleBindings and ClusterRoleBindings
Once you’ve defined your roles, the next step is to link them to users or service accounts. RoleBindings grant permissions within a single namespace, while ClusterRoleBindings apply permissions across the entire cluster.
You can create these bindings either via the command line or with YAML manifests. For example, to create a binding using the command line, you can run:
kubectl create rolebinding [NAME] --role=[ROLE_NAME] --user=[USER_NAME] . If you’re working with version-controlled configurations, it’s better to define bindings in YAML. In these manifests, use the subjects field to specify who gets access and the roleRef field to reference the role you’re assigning.
A practical approach is to reference a ClusterRole in a RoleBinding. This allows you to reuse common permissions across multiple namespaces without granting cluster-wide access. For instance, you can create a ClusterRole called app-developer with standard permissions and then use RoleBindings to assign it only in the dev and staging namespaces.
Keep in mind: the roleRef field in a binding is immutable. If you need to change the referenced role, you’ll have to delete and recreate the binding. To simplify updates when modifying your manifest files, you can use the kubectl auth reconcile command.
Bindings connect roles to three types of subjects:
- Users: Identified by usernames, such as "alice@example.com."
- Groups: Collections of users, like "system:authenticated."
- ServiceAccounts: Applications running inside pods, which require a namespace field.
Once your bindings are set up, it’s essential to test and validate them.
Test and Verify Permissions
To ensure your bindings work as intended, you’ll need to test permissions. The kubectl auth can-i command is your go-to tool for validating RBAC configurations. For example, to check your own permissions, run:
kubectl auth can-i <verb> <resource> If you need to test permissions for another user, use the --as flag, like this:
kubectl auth can-i list pods --as=alice For service accounts, specify the identifier in this format:
--as=system:serviceaccount:<namespace>:<serviceaccountname> .
Make sure to test both positive cases (confirming allowed actions work) and negative cases (ensuring unauthorized actions are blocked). For instance, verify that a developer in the dev namespace cannot access secrets in the prod namespace. If the API server denies an action, it will return a "Forbidden" error, detailing the user, resource, or API group missing from their role.
To review your entire RBAC configuration, use:
kubectl get rolebindings,clusterrolebindings -A This provides a cluster-wide view. For more detailed information about a specific binding, run:
kubectl describe rolebinding <name> This command lets you verify the roleRef and subjects fields. For thorough testing, consider creating a temporary KUBECONFIG file using a service account token.
"RBAC is the glue that connects Users to Actions. Without it, your authenticated user is just a person standing in the lobby with no keys to any doors." – k8s.guide
Common Pitfalls and Troubleshooting
Avoid Over-Permissive Roles
One of the most common mistakes when setting up RBAC is granting excessive permissions. For instance, using the wildcard * in apiGroups, resources, or verbs can unintentionally give access to all current and future resource types. This violates the principle of least privilege, as any new resources or subresources added in future Kubernetes updates will automatically fall under the role’s permissions.
Here’s an example: granting the create verb on Pods might unintentionally expose sensitive resources like Secrets, ConfigMaps, and ServiceAccounts. Similarly, allowing list or watch permissions on Secrets effectively provides the same level of access as get because the API response may include the full content of all Secrets.
Be particularly cautious with powerful verbs such as escalate, bind, and impersonate. These can override RBAC restrictions and lead to unauthorized access. As Kubernetes documentation advises:
"Ideally, minimal RBAC rights should be assigned to users and service accounts. Only permissions explicitly required for their operation should be used".
To limit over-permissiveness, use the resourceNames field to grant access to specific resources – like a single ConfigMap named my-config – instead of applying permissions broadly. Additionally, set automountServiceAccountToken: false in your Pod specifications if the workload doesn’t need to communicate with the Kubernetes API.
Finally, ensure permissions are scoped to the intended namespaces to avoid unintended access.
Namespace Isolation Challenges
When working with namespace restrictions, it’s critical to distinguish between ClusterRoleBindings and RoleBindings. A ClusterRoleBinding provides access to namespaced resources across the entire cluster, even if your intention was to limit access to a single namespace. To avoid this, use RoleBindings to confine permissions within a specific namespace.
Another frequent issue involves binding roles to the system:authenticated or system:unauthenticated groups. These bindings can unintentionally grant permissions to any user who can reach the API server, including anonymous users. Carefully review these bindings and remove any unnecessary ones to tighten your cluster’s default access controls.
Debugging RBAC Issues
Once you’ve configured tight permissions and clarified namespace boundaries, you may still encounter issues that require troubleshooting. Start by testing specific actions with the kubectl auth can-i command. For example:
kubectl auth can-i list secrets --as alice --namespace dev If you’re testing for service accounts, use the full identifier format:
--as=system:serviceaccount:{namespace}:{service-account-name} When problems persist, check the Kubernetes API server audit logs for RBAC DENY errors. These logs can reveal details about group memberships and missing permissions.
Keep in mind that roleRef is immutable. If you need to update bindings, delete and recreate them, or use kubectl auth reconcile. To confirm that RBAC is enabled, run:
kubectl api-versions | grep rbac Alternatively, verify that your API server is configured with the --authorization-mode=RBAC flag. Lastly, remember that subject names are case-sensitive, so double-check your spelling to avoid unnecessary errors.
sbb-itb-f9e5962
Conclusion
Key Points Recap
To set up Role-Based Access Control (RBAC) effectively in Kubernetes, follow these steps: enable RBAC, define subjects (users, groups, or ServiceAccounts), create Roles or ClusterRoles with precise permissions, and bind them using RoleBindings or ClusterRoleBindings. Use kubectl auth can-i to verify permissions and ensure proper access control.
As highlighted in the Kubernetes documentation:
"RBAC is a key security control to ensure that cluster users and workloads have only the access to resources required to execute their roles".
Implementing the Principle of Least Privilege is essential. It minimizes the impact of compromised credentials and prevents unauthorized access to critical resources like Secrets.
To avoid common mistakes:
- Avoid using wildcards in role definitions.
- Use RoleBindings instead of ClusterRoleBindings to limit permissions to specific namespaces whenever possible.
- Never add users to the
system:mastersgroup. - Regularly audit your Roles and Bindings to remove outdated or unnecessary permissions.
By applying these best practices, you can strengthen your cluster’s security and ensure a solid foundation for managing access.
Next Steps with TechVZero

Now that you’ve laid the groundwork for RBAC, consider partnering with TechVZero to take your Kubernetes infrastructure to the next level. If you’re managing Kubernetes at scale and need a secure, cost-efficient environment, TechVZero offers expertise you can count on. We’ve demonstrated success at scales of over 99,000 nodes while delivering significant cost savings.
Our approach is tailored for engineering-focused founders who want reliable infrastructure without the need to become infrastructure experts. Here’s how we work:
- Performance-driven model: We earn 25% of savings for a year – nothing if we don’t meet our agreed savings floor.
- Compliance support: Whether you need SOC2, HIPAA, or ISO compliance within your timeline, we’ve got you covered.
- End-to-end solutions: From infrastructure optimization to full operational support, we act as an extension of your team, not just an external advisor.
Visit TechVZero to discover how we can help secure and optimize your Kubernetes environment, saving you time, money, and effort while ensuring your critical workloads are protected.
Kubernetes RBAC full tutorial with examples
FAQs
How do I check if RBAC is enabled on my Kubernetes cluster?
To determine whether RBAC (Role-Based Access Control) is enabled on your Kubernetes cluster, you can check the API server configuration for the --authorization-mode flag. If this flag includes RBAC, it confirms that RBAC is active.
Another way to verify is by using the command:
kubectl auth can-i <action> <resource>
This command checks your permissions. If it provides a response, it indicates that RBAC is being used to manage access controls within your cluster.
What is the difference between a Role and a ClusterRole in Kubernetes?
In Kubernetes, a Role is designed to manage permissions within a single namespace, making it namespace-specific. On the other hand, a ClusterRole grants permissions across the entire cluster, meaning it operates at the cluster level.
If your goal is to control access confined to a specific namespace, a Role is the right choice. However, when permissions need to extend across multiple namespaces or the entire cluster, a ClusterRole is the better fit.
How can I verify if a user or service account has the correct permissions in Kubernetes?
To determine whether a user or service account has the right permissions in Kubernetes, you can use the kubectl auth can-i command. This tool helps you verify if a specific action is authorized for a user or account. For instance, to check if you have the ability to create pods across all namespaces, you would run:
kubectl auth can-i create pods --all-namespaces If the command returns yes, it means the action is allowed. For deeper validation, you might also consider using kubectl auth reconcile. This command helps you align RBAC rules, ensuring that roles and role bindings are correctly configured to match your intended setup. Both commands are invaluable for efficiently checking and troubleshooting RBAC permissions.