Kubernetes Scheduling for Spot: Eviction-Resilient Patterns that Save 40%+

Running Kubernetes on spot instances can slash cloud costs by 70–90%, but interruptions make them tricky to manage. This guide explains how to maximize savings while maintaining reliability. Key takeaways:
- Spot Savings: Spot pricing can reduce monthly compute costs significantly (e.g., $6,912 to $691 for 100 m5.large instances).
- Challenges: Spot instances face sudden terminations (2 minutes on AWS, 30 seconds on Azure/Google).
- Best Workloads: Stateless apps, batch jobs, and ML tasks thrive on spot; critical workloads (e.g., databases) are better on-demand.
- Key Strategies: Use Pod Disruption Budgets, Topology Spread Constraints, and autoscaling tools like Karpenter.
Learn how to handle interruptions, diversify instance types, and monitor savings effectively.
How Skyscanner Built a Resilient k8s Platform on EC2 Spot/EKS and Saved 73% of Their Cloud Spend

sbb-itb-f9e5962
What Are Spot Instances and Why They’re Difficult to Manage
Spot instances are essentially unused cloud resources that cloud providers sell at heavily discounted rates to maximize their data center usage. They offer full hardware performance at a fraction of the cost, making them an attractive option for reducing expenses. However, their preemptive nature – where providers can reclaim the capacity at any time – requires precise scheduling strategies, which can be tricky to manage. This guide dives into how to handle those challenges effectively.
These instances operate on a "use it while you can" model. Providers like AWS, Azure, and Google Cloud can take back the capacity when demand spikes. While on-demand instances guarantee availability (at full price), spot instances trade that reliability for significant cost savings.
How Spot Instances Cut Cloud Costs
The pricing structure of spot instances is what makes them so appealing for cost-conscious teams.
Take Branch, for example – a marketing automation company. In 2025, they automated spot instance management for their Kubernetes clusters. Under the leadership of former Senior VP of Engineering Mark Weiler, they saved millions annually and slashed their EC2 compute costs by over 25%, all while meeting strict reliability SLAs. Another example is Wio Bank, which runs 90% of its non-production environments on spot VMs. This approach has allowed them to dramatically lower costs without requiring manual oversight.
The cost savings stem from a pricing model that constantly adjusts based on real-time supply and demand.
The Problem with Spot Instance Terminations
While spot instances are budget-friendly, they come with a major downside: termination notices. AWS gives a 2-minute warning, but Azure and Google Cloud provide only 30 seconds. When a termination notice is issued, the node hosting your workloads is removed, and its pods are evicted. This can disrupt services if not managed carefully.
The timing is critical. For example, AWS provides a 2-minute warning, but spinning up a replacement node typically takes about 5 minutes. This leaves a 3-minute gap where workloads may not have a place to run. On top of that, over half of AWS spot disruptions occur within the first hour of a node’s life.
"A two-minute warning may not be adequate for many workloads."
- John Garcia, nOps
Stateless applications are generally able to bounce back quickly through rescheduling, though they may still experience brief outages. Stateful applications, however, face a bigger risk. Without properly configured Persistent Volume Claims, any ephemeral storage tied to the terminated node is lost, which could result in data loss.
Fortunately, Kubernetes has built-in mechanisms to reschedule pods after a termination, helping to reduce the impact of these disruptions. In the next section, we’ll explore scheduling strategies that DevOps teams can use to address these challenges effectively.
Which Workloads Should Run on Spot Instances
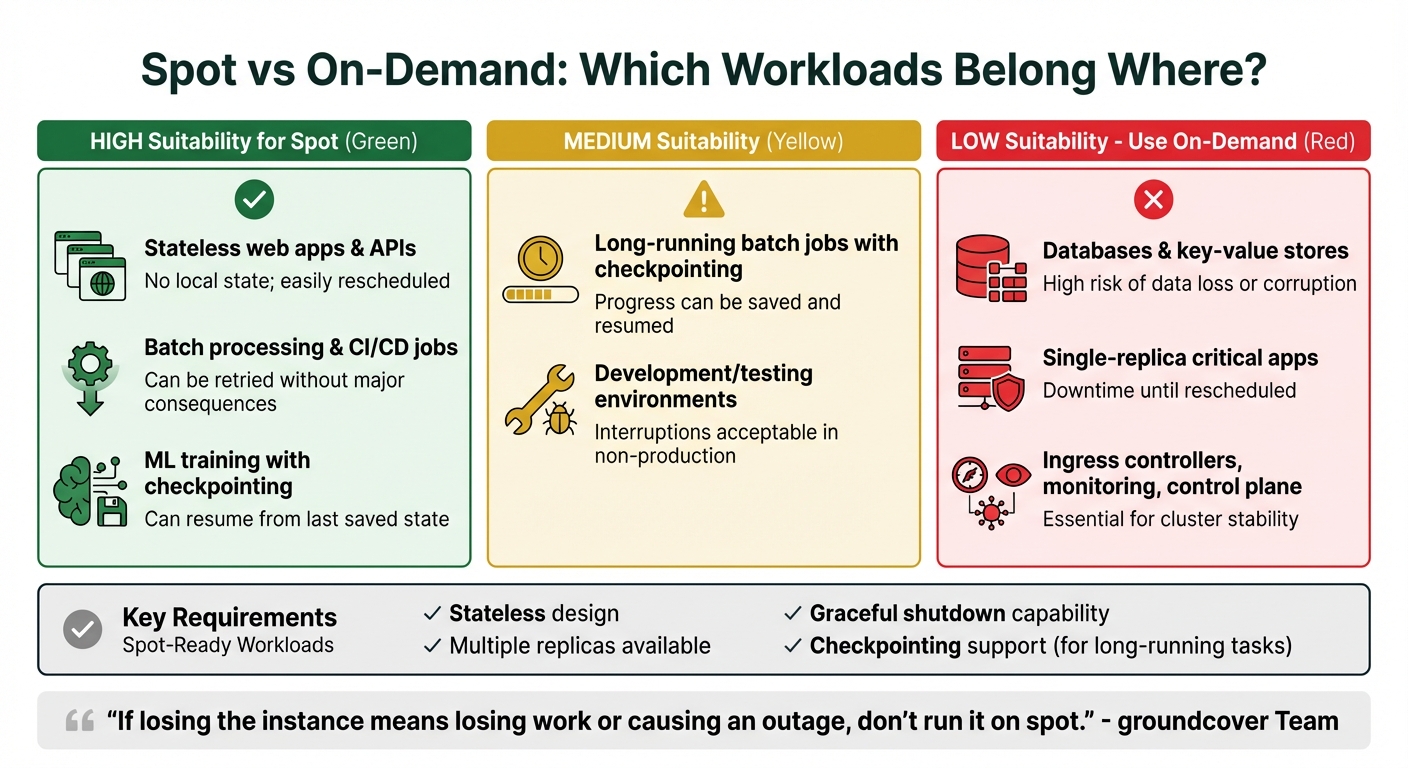
Spot vs On-Demand Workload Suitability for Kubernetes
One of the smartest ways to cut costs with Kubernetes is by matching workloads to the unpredictable nature of spot instances. The key here? Only run workloads that can handle sudden interruptions without breaking a sweat.
Stateless applications – like web servers, APIs, and microservices – are perfect candidates because they don’t rely on local persistent data. Similarly, batch processing jobs, CI/CD runners, and machine learning tasks with checkpointing capabilities are also great fits since they can resume or retry without major issues. On the other hand, critical workloads like databases, single-replica applications, or core cluster infrastructure should stick to on-demand instances to avoid potential data loss or service downtime.
Spot-Compatible vs. On-Demand Workloads
To decide if a workload is ready for spot instances, check if it meets these four criteria: it’s stateless, can run with multiple replicas, shuts down gracefully, and – if it’s long-running – supports checkpointing.
Deployments often work well on spot instances because they’re designed for stateless scaling and can be rescheduled easily. However, workloads like StatefulSets, which risk data integrity, or single-replica applications, which can cause downtime if evicted, are better suited for on-demand instances.
"If losing the instance means losing work or causing an outage, don’t run it on spot."
- groundcover Team
Critical components of your infrastructure – such as ingress controllers, monitoring agents, DNS services, and cluster management tools – should always run on on-demand nodes. A common approach is to keep these "anchor" workloads on a small pool of on-demand nodes, while scaling your application workers on spot instances.
| Workload Type | Spot Suitability | Reason |
|---|---|---|
| Stateless web apps, APIs | High | No local state; easily rescheduled |
| Batch processing, CI/CD jobs | High | Can be retried without major consequences |
| ML training with checkpointing | Medium | Can resume from the last saved state |
| Databases, key-value stores | Low | High risk of data loss or corruption |
| Single-replica critical apps | Low | Downtime until rescheduled |
| Ingress, monitoring, control plane | Low | Essential for cluster stability |
Spot instances are a great tool, but preparing your workloads to handle interruptions is just as important as choosing the right ones.
Making Workloads Interruption-Tolerant
To run smoothly on spot instances, workloads need to be interruption-ready. Start by ensuring your application handles termination signals (SIGTERM) properly. This means stopping new connections, finishing in-flight requests, and shutting down cleanly within the notice window provided by your cloud provider (usually 30–120 seconds).
Kubernetes preStop hooks can be a lifesaver here. For example, you can use them to save the state of a machine learning task to persistent storage (like S3 or a Persistent Volume Claim) as soon as a termination signal is received. This ensures you don’t lose progress if a node is reclaimed.
Pod Disruption Budgets (PDBs) are another useful tool. They help maintain availability during spot interruptions by setting policies like minAvailable: 2, which ensures that at least two replicas remain running. However, keep in mind that during severe capacity shortages, PDBs might not always be honored.
Lastly, diversify your instance types. By configuring node pools with 4–5 different instance families (e.g., m5.large, m6i.large, and c5.large), you spread your risk across multiple spot markets. This reduces the chance of running out of capacity in a single market and increases overall availability.
Up next, we’ll explore Kubernetes scheduling patterns that further enhance resilience against spot instance evictions.
Kubernetes Patterns for Handling Spot Instance Evictions
Once you’ve identified the workloads suited for spot instances, the next step is configuring Kubernetes to handle potential evictions effectively. Here’s how you can set it up.
Using Node Labels, Taints, and Tolerations
Node labels are key to steering workloads toward spot instances. For example, spot nodes typically come with labels like cloud.google.com/gke-spot: "true" or spotinst.io/node-lifecycle: spot. You can use these labels with node affinity to control where your pods are scheduled.
- If you want pods to run only on spot nodes, use a hard constraint (
requiredDuringSchedulingIgnoredDuringExecution). - For flexibility, a soft constraint (
preferredDuringSchedulingIgnoredDuringExecution) will try spot nodes first but fall back to on-demand nodes if spot capacity is unavailable.
Taints and tolerations add another layer of control. By tainting spot nodes with key=spot:NoSchedule, you ensure that only pods with the right tolerations can run there. This is especially useful for keeping critical workloads off spot nodes. For pods meant to run on spot, include a matching toleration in their spec. If stricter control is needed, apply the NoExecute taint effect, which evicts pods that don’t tolerate the taint.
Keep in mind that in GKE Autopilot, the grace period for spot evictions is capped at 15 seconds, no matter what you set in terminationGracePeriodSeconds. Adjust your shutdown logic accordingly to handle this limitation.
For added resilience, combine these configurations with Pod Disruption Budgets.
Setting Pod Disruption Budgets
Pod Disruption Budgets (PDBs) help minimize disruptions by turning spot interruptions into voluntary evictions via the Kubernetes Eviction API. Essentially, the API won’t terminate a pod if doing so would drop the number of available replicas below your specified threshold.
Use maxUnavailable instead of minAvailable for better scalability. For instance, setting maxUnavailable: 33% ensures that no more than one-third of your pods can be evicted at any time, whether you have 3 replicas or 30. Avoid settings like maxUnavailable: 0 or minAvailable: 100%, as they can block node drains and lead to hard terminations.
To prevent pods stuck in CrashLoopBackOff from blocking node drains, enable the unhealthyPodEvictionPolicy: AlwaysAllow setting, which became stable in v1.31. For quorum-based systems like etcd or ZooKeeper, set minAvailable to match the quorum size. This ensures the eviction API doesn’t disrupt consensus during large-scale terminations.
Distributing Pods with Topology Spread Constraints
To boost resilience further, distribute pods across different failure domains using Topology Spread Constraints. This prevents all your pods from landing on the same node or availability zone. Use topologyKey: topology.kubernetes.io/zone to spread replicas across zones, reducing the impact of spot interruptions in any single zone.
The maxSkew field defines how evenly pods are distributed. A maxSkew of 1 ensures that the difference in pod count between any two zones or nodes doesn’t exceed one. For spot workloads, set whenUnsatisfiable: ScheduleAnyway. This tells the scheduler to aim for balance but allows it to proceed even if perfect distribution isn’t possible due to limited spot capacity.
To refine this strategy, pair topology constraints with nodeAffinityPolicy: Honor and nodeTaintsPolicy: Honor (introduced in v1.33). These settings ensure the scheduler only considers nodes that match your pod’s tolerations when calculating spread. This prevents the scheduler from inadvertently balancing pods across on-demand nodes when you’ve targeted a spot-only pool.
Advanced Strategies for Spot Instance Reliability and Autoscaling
Diversifying Instance Types and Availability Zones
Relying on a single instance family can leave your workloads vulnerable to disruptions. To mitigate this, configure your node groups to include 4–5 different instance types with similar CPU and memory specifications, such as m5, c6i, and r6g. This way, if one instance type becomes unavailable, Kubernetes can pull from other pools to maintain operations.
Availability zones operate as separate capacity pools, each with its own pricing and availability. For example, scarcity in one zone (like us-east-1a) typically doesn’t impact another zone (like us-east-1b). By using topology spread constraints to distribute pods across multiple zones, you can protect your service from being entirely disrupted by a single reclaim event. Additionally, adopting a capacity-optimized allocation strategy lets your cloud provider select instance types from the most readily available spot pools, adding another layer of reliability.
Configuring Cluster Autoscaler and HPA for Spot Instances
For optimal performance, separate spot and on-demand instances into distinct node groups. Mixing these capacity types in one group can lead to unpredictable scheduling. Once separated, configure the priority expander to favor spot instances by assigning them a higher priority (e.g., priority 10) while setting on-demand groups to a lower priority (e.g., priority 50). This ensures the autoscaler scales spot capacity first and only falls back to on-demand when necessary.
To prepare for scaling, deploy pause pods with negative priority. These pods pre-reserve capacity, allowing real workloads to preempt them instantly when the Horizontal Pod Autoscaler (HPA) scales up. Meanwhile, the Cluster Autoscaler works in the background to bring new nodes online. For workloads that are costly to restart, such as machine learning or big data tasks, use the annotation cluster-autoscaler.kubernetes.io/safe-to-evict=false to prevent their nodes from being terminated during scale-down events.
These configurations build a robust foundation for managing spot interruptions effectively.
Handling Spot Interruptions Gracefully
Spot interruptions are inevitable, but cloud providers give some notice. AWS provides a 2-minute interruption notice, while Google Cloud and Azure offer around 30 seconds. Tools like Karpenter or AWS Node Termination Handler (NTH) can automatically respond to these signals by cordoning and draining nodes before termination. However, avoid running both tools simultaneously, as they may conflict when managing the same node.
Set terminationGracePeriodSeconds to 120 seconds to give pods time to finish active requests. To further reduce disruption, use preStop hooks to delay termination – such as a 90-second sleep – so load balancers can stop routing traffic before the node shuts down. For long-running batch jobs, consider application-level checkpointing to save progress and allow jobs to resume from the last checkpoint rather than starting over.
A great example of this approach comes from HP PrintOS, which used Karpenter with spot instances for 3D simulation jobs. The result? A 40% improvement in node utilization and annual savings of over $125,000.
"When you follow the best practices, the impact of interruptions is insignificant because interruptions are infrequent and don’t affect the availability of your application." – Scott Horsfield, Sr. Specialist Solutions Architect, AWS
Monitoring Spot Instances and Measuring Cost Savings
Tracking Spot Instance Terminations
Keeping tabs on spot instance interruptions is crucial to ensure your services remain reliable. Tools like AWS Node Termination Handler (NTH) or Karpenter can help automate the process. They monitor termination signals – sent via EC2 metadata or EventBridge – and respond to AWS’s 2-minute warning by cordoning and draining nodes before they’re terminated.
To stay ahead of interruptions, consider setting up Prometheus alerts. For instance, you could configure alerts to notify your team if the interruption rate exceeds a certain threshold, such as 0.1 interruptions per hour. Additionally, integrating Slack webhooks into your termination handler can provide real-time notifications when a node is marked for reclamation. This ensures your DevOps team stays informed without needing to constantly monitor dashboards.
When nodes disappear, traditional monitoring often falls short. That’s where centralized logging and tools like groundcover (which uses eBPF) come into play. These solutions preserve visibility into pod performance and logs, even after the underlying spot node is terminated. This is particularly useful for avoiding the frustration of losing critical debugging data during an investigation.
To test your monitoring setup, try interruption simulations with tools like AWS Fault Injection Simulator or amazon-ec2-spot-interrupter. These simulations, often referred to as "Game Days", allow you to validate whether your system detects termination events and whether pods reschedule as expected. Key metrics to measure include pod rescheduling time, error rate spikes, and how quickly new nodes join the cluster.
Once your monitoring is solid, the next step is to dive into the numbers and calculate your cost savings.
Calculating Cost Savings and ROI
Figuring out your savings is pretty straightforward. Use this formula:
Hourly Savings = (On-Demand Price – Spot Price) × Number of Nodes.
To estimate monthly savings, multiply the hourly savings by 730 (the average number of hours in a month). For example, running 10 m5.large instances on spot pricing at $0.029/hour instead of the on-demand rate of $0.096/hour saves around $490 per month – a reduction of about 70%.
To better track savings, apply cost allocation labels like cost-center, team, and environment to your deployments. Tools like Kubecost or OpenCost simplify this process by comparing your actual spend against what you would have paid using on-demand instances. These tools provide real-time insights into savings at the cluster, namespace, or workload level.
A 2025 Kubernetes Cost Benchmark Report revealed that clusters combining on-demand and spot instances achieved an average savings of 59%, while spot-only clusters reached 77%. For instance, Wio Bank transitioned 90% of their non-production environments to Spot VMs using CAST AI automation, resulting in substantial cost reductions.
"We cut our costs in half and now have full coverage in prod, dev, and testing environments where we previously had to limit it due to cost concerns." – Sushant Gulati, Sr Engineering Mgr, BigBasket
Beyond just the dollar savings, it’s important to evaluate operational metrics. For example, monitor the ratio of spot-to-on-demand capacity and track how often involuntary terminations occur compared to voluntary node refreshes. These insights help you assess whether your scheduling approach balances cost efficiency with system stability effectively.
Conclusion
Running Kubernetes workloads on spot instances strikes a balance between cutting costs and maintaining system resilience. By using strategies like Pod Topology Spread Constraints, Pod Disruption Budgets, graceful termination handling, and instance diversification, you can optimize costs without compromising service reliability.
These approaches allow businesses to achieve notable savings on infrastructure. For example, organizations like nOps have reported reducing Kubernetes costs by 50–60% through these methods. Success in this area often hinges on combining automation tools, such as Karpenter, with thoughtful workload classification and scheduling constraints.
"When you pair spot instances with Kubernetes’ built-in resilience and self-healing capabilities, you get a system that can handle interruptions without service disruption." – groundcover
Beyond the immediate financial benefits, adopting spot instances encourages teams to design applications that are stateless and fault-tolerant, with solid health checks and coordinated shutdown processes. This not only improves system reliability but also ensures readiness for potential disruptions – even if they never occur. A strong approach includes keeping critical components like databases and ingress controllers on on-demand nodes while leveraging spot instances for scaling stateless workloads. By using automation to handle the 2-minute termination window effectively, you can create a robust and cost-efficient architecture.
FAQs
What makes spot instances more cost-effective than on-demand instances?
Spot instances offer a budget-friendly way to access cloud resources by utilizing unused capacity at steeply discounted rates – sometimes as much as 90% lower than on-demand prices. This makes them an appealing option for businesses aiming to slash infrastructure expenses without compromising on performance.
That said, spot instances come with a trade-off: they can be interrupted if the cloud provider reclaims the capacity. For this reason, they work best for tasks that can tolerate interruptions, such as batch processing, training AI models, or running stateless applications. To make the most of these savings while keeping interruptions manageable, you can implement eviction-resilient strategies, like Kubernetes scheduling patterns, to maintain efficiency and reduce disruptions.
How can I make my Kubernetes workloads more resilient to interruptions on spot instances?
To ensure your Kubernetes workloads can handle interruptions on spot instances, consider these strategies:
- Leverage interruption notices provided by cloud services like AWS. These alerts allow you to prepare for and manage disruptions ahead of time.
- Use node cordoning and draining to safely evict pods from spot instances that are about to be reclaimed.
- Set up PodDisruptionBudgets to maintain the availability of critical workloads during node drains.
- Activate rescheduling mechanisms to automatically relocate pods to healthy nodes when interruptions happen.
By applying these methods, you can reduce downtime and make your applications more resilient to the unpredictable nature of spot instances.
How does Karpenter help manage interruptions when using spot instances in Kubernetes?
Karpenter simplifies handling spot instance interruptions in Kubernetes by automating how compute resources are provisioned and managed. It keeps an eye on unschedulable pods and adjusts node capacity on the fly to meet workload needs, helping maintain high availability even when spot instances are disrupted.
Some standout features include spot-to-spot consolidation and interruption handling. When spot instances are interrupted, Karpenter takes action by spinning up new nodes and redistributing workloads, keeping downtime to a minimum. Using interruption signals, it ensures workloads are smoothly transitioned, boosting reliability and reducing disruptions. These features make Karpenter an effective solution for managing Kubernetes clusters in a cost-efficient and dependable way.