Multi-Tenant Resource Scheduling in Kubernetes

Managing multiple teams or customers in a shared Kubernetes cluster can be tricky. It often leads to resource contention, security risks, and operational complexity. Multi-tenant resource scheduling solves this by allowing workloads from different users to run on shared infrastructure while maintaining isolation and efficient resource use.
Key Takeaways:
- Multi-Tenancy Types:
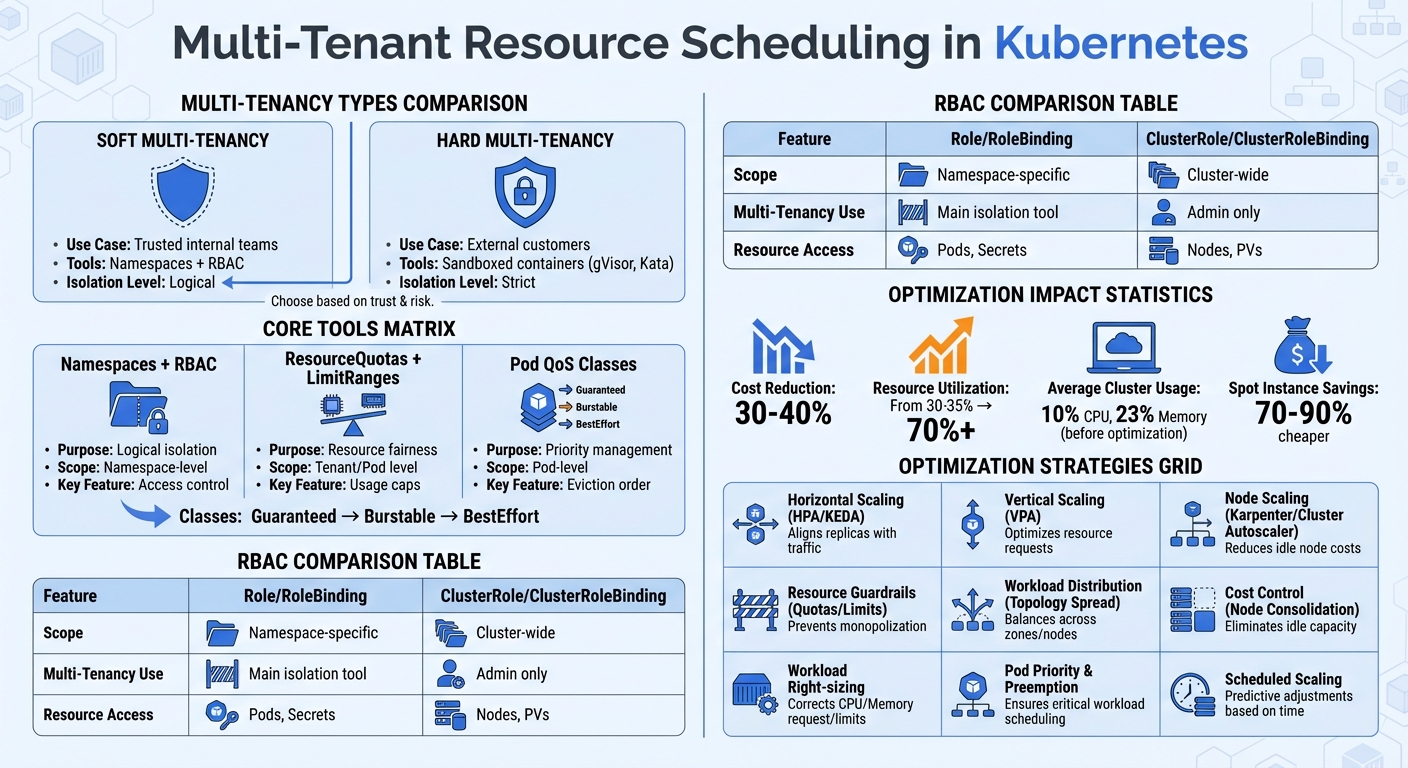
- Soft Multi-Tenancy: Uses namespaces and RBAC, suitable for trusted internal teams.
- Hard Multi-Tenancy: Employs stricter isolation (e.g., sandboxed containers) for external customers.
- Challenges:
- Noisy Neighbor Problem: One tenant consuming excessive resources affects others.
- Security Risks: Shared kernels increase the chance of container breakouts and data leaks.
- Core Tools:
- Namespaces with RBAC: Logical isolation with access control.
- ResourceQuotas and LimitRanges: Restrict resource usage for fairness.
- Pod QoS Classes: Manage pod priorities during resource shortages.
- Advanced Techniques:
- Pod Priority and Preemption: Ensures critical workloads get resources first.
- Custom Schedulers: Enables tailored scheduling logic for unique needs.
- Node Affinity, Taints, and Tolerations: Isolate workloads at the hardware level.
- Optimization:
- Use autoscaling (HPA, VPA) to match resources with demand.
- Apply topology spread constraints to distribute workloads evenly.
- Implement cost-saving measures like node consolidation and spot instances.
These strategies help reduce costs, improve resource utilization, and maintain isolation, making Kubernetes clusters more efficient for multi-tenant environments.
Multi-Tenant Kubernetes: Types, Tools, and Optimization Strategies Comparison
Session 1: The State of Multi-tenancy in Kubernetes
Core Concepts of Multi-Tenant Resource Scheduling
Creating an effective multi-tenant cluster relies on three key building blocks: namespaces with Role-Based Access Control (RBAC), resource quotas with limit ranges, and pod Quality of Service (QoS) classes. These tools help divide resources, set usage limits, and prioritize workloads. Let’s break down how each of these components forms the backbone of multi-tenant scheduling.
Namespaces and Role-Based Access Control (RBAC)
Namespaces allow you to divide a physical cluster into separate segments, ensuring that different teams or customers can share resources without stepping on each other’s toes.
Mike Calizo, Principal Customer Success Manager at Elastic.co, explains that namespaces provide "basic building blocks of access control using RBAC and isolation for applications, users, or groups of users". RBAC ensures that tenants only access the namespaces and resources they need, following the principle of least privilege. To enforce this, use Role and RoleBinding to restrict access to specific namespaces. Avoid assigning ClusterRoleBindings to tenants, as these grant permissions cluster-wide.
The Kubernetes documentation emphasizes the importance of strict access controls: "If teams can access or modify each other’s API resources, they can change or disable all other types of policies, thereby negating any protection those policies may offer".
| Feature | Role / RoleBinding | ClusterRole / ClusterRoleBinding |
|---|---|---|
| Scope | Limited to a specific namespace | Cluster-wide (all namespaces) |
| Multi-Tenancy Use | Main tool for tenant isolation | Reserved for cluster administrators |
| Resource Access | Namespaced resources (e.g., Pods, Secrets) | Cluster-level resources (e.g., Nodes, PVs) |
Keep in mind that namespaces alone don’t provide network isolation. For that, you’ll need to implement Network Policies to block traffic between tenant namespaces. In larger environments, automating namespace management ensures consistent RBAC and quota policies across all tenants.
Resource Quotas and LimitRanges
ResourceQuotas manage resource fairness at the tenant level by capping the total CPU, memory, storage, and object usage within a namespace. Meanwhile, LimitRanges ensure fairness within a namespace by preventing any single pod from consuming an excessive share of resources. If a tenant tries to exceed these limits, the API server rejects the request with a 403 Forbidden error.
When ResourceQuotas are in place for CPU or memory, Kubernetes requires all new pods in the namespace to declare specific resource requests and limits. LimitRanges can even set default values for containers that don’t specify them, keeping workloads within their allocated share. As noted in Kubernetes documentation, "resource quotas are a tool for administrators to address [the concern that one team could use more than its fair share of resources]".
Pairing quotas with limit ranges is essential. This combination ensures that default resource values are applied and prevents pod rejections for workloads missing resource declarations. Monitoring resource usage (e.g., via kubectl describe quota) helps you identify tenants nearing their limits and address potential issues early.
Pod Quality of Service (QoS) Classes
Pods are categorized into three QoS classes based on their resource requests and limits:
- Guaranteed: All containers in the pod have equal CPU and memory requests and limits.
- Burstable: At least one container has a CPU or memory request or limit, but not all meet Guaranteed criteria.
- BestEffort: No resource requests or limits are set.
These QoS classes determine how Kubernetes handles pods during resource shortages. If a node runs low on resources, pods are evicted in this order: BestEffort first, followed by Burstable, and finally Guaranteed. This makes QoS classes an effective tool for managing service tiers. For example, premium tenants can be assigned Guaranteed resources, while free-tier workloads operate under BestEffort allocations.
Guaranteed pods with integer CPU requests may even receive exclusive CPU cores using the static CPU management policy. Additionally, you can use ResourceQuota scopes (e.g., BestEffort or NotBestEffort) to control resource usage by specific pod classes within a namespace. For clusters running on cgroup v2, enabling Memory QoS ensures that pods receive their requested memory, reducing the risk of kernel-level memory reclamation.
Advanced Techniques for Multi-Tenant Scheduling
Once you’ve set up namespaces, quotas, and QoS classes, you can take your multi-tenant scheduling to the next level with advanced controls. These techniques allow you to fine-tune how tenant workloads compete for resources by prioritizing, customizing, and isolating them more effectively.
Pod Priority and Preemption
Pod priority ensures that critical workloads always get the resources they need. By using PriorityClass objects, you can assign importance levels to tenant workloads with a 32-bit integer value – higher numbers mean higher priority. When the scheduler processes pending pods, it prioritizes higher-value pods over lower-value ones. If resources are unavailable for a high-priority pod, the scheduler can preempt (or evict) lower-priority pods to make room.
This feature has been stable since Kubernetes 1.14. Priority values range from -2,147,483,648 to 1,000,000,000, with anything over 1 billion reserved for system-critical pods like system-cluster-critical (value: 2,000,000,000) and system-node-critical (value: 2,000,001,000).
However, there’s a catch. The Kubernetes documentation warns:
"In a cluster where not all users are trusted, a malicious user could create Pods at the highest possible priorities, causing other Pods to be evicted/not get scheduled".
To prevent misuse, use RBAC to control which tenants can create or use high-priority classes. Combine this with ResourceQuotas to limit the number of high-priority pods a tenant can run. If evictions are undesirable, such as for batch jobs or data science tasks, you can set preemptionPolicy: Never to keep pods in the scheduling queue without disrupting running workloads.
| Feature | Pod Priority | Quality of Service (QoS) |
|---|---|---|
| Primary Function | Determines scheduling order and preemption of other pods. | Determines eviction order during node resource pressure. |
| Controlled By | PriorityClass (integer value). |
Resource requests and limits (Guaranteed, Burstable, BestEffort). |
| Scope | Cluster-wide scheduling decisions. | Local node-level resource management. |
| Mechanism | Scheduler evicts lower-priority pods to fit higher ones. | Kubelet evicts pods based on usage vs. requests. |
Keep an eye on preemption events through monitoring tools. Frequent preemptions can indicate poorly configured priority tiers or resource shortages.
Custom Schedulers for Better Resource Allocation
When basic prioritization isn’t enough, custom schedulers allow for more precise resource allocation. While the default scheduler works well for general use, multi-tenant environments often demand unique logic, such as Dominant Resource Fairness (DRF) to balance CPU, memory, and storage across tenants. By leveraging the Scheduling Framework’s extension points (Filter, Score, Permit), you can add custom scheduling rules.
A single kube-scheduler instance can support multiple profiles, each configured with different plugins and weights. This setup enables you to apply unique scheduling rules to different tenants without deploying separate scheduler binaries. Assign a schedulerName to each profile and reference it in pods via spec.schedulerName. However, shared profiles must use the same queueSort plugin.
Custom schedulers need a dedicated ServiceAccount with ClusterRoles like system:kube-scheduler and system:volume-scheduler to interact with the API server and bind pods. Deploy them with leaderElection enabled to ensure high availability and avoid conflicting decisions. You can even associate a profile with addedAffinity to restrict pods using that scheduler to specific nodes – perfect for tenant isolation.
Node Affinity, Taints, and Tolerations
To further isolate tenant workloads at the hardware level, use node affinity and taints. Node affinity attracts pods to specific nodes, while taints repel them. Tolerations allow pods to override taints and schedule on otherwise restricted nodes. Together, these tools enable the "dedicated nodes" pattern, ensuring strict tenant isolation.
Here’s how it works: Apply a taint (e.g., tenant=acme:NoSchedule) to reserve nodes for a particular tenant. This blocks unauthorized pods from running on those nodes. Then, add a matching toleration to the tenant’s pods and use node affinity to ensure they actually schedule on the reserved nodes instead of general-purpose ones.
Taints come in three effects:
NoSchedule: Blocks new pods.PreferNoSchedule: Avoids scheduling unless necessary.NoExecute: Evicts existing pods without matching tolerations.
For strict isolation, use label keys with the node-restriction.kubernetes.io/ prefix. This prevents compromised nodes from modifying their own labels to attract sensitive workloads. Kubernetes v1.35 introduced numeric comparison operators (Gt for greater than, Lt for less than) as an alpha feature, enabling threshold-based scheduling for tasks like SLA tiers.
| Feature | Target | Primary Purpose | Multi-Tenant Benefit |
|---|---|---|---|
| Node Affinity | Pod | Attraction to Nodes | Ensures tenant workloads land on their assigned hardware. |
| Taints | Node | Repulsion of Pods | Prevents "noisy neighbors" or other tenants from using reserved nodes. |
| Tolerations | Pod | Exception to Taints | Grants specific tenant Pods permission to enter "repelling" nodes. |
Manually managing tolerations for every tenant pod can be tedious and error-prone. Instead, use a custom admission controller to automatically inject tolerations and node affinity rules based on the pod’s namespace. For specialized hardware like GPUs, the ExtendedResourceToleration admission controller can simplify the process by automatically adding tolerations to pods and tainting nodes with the resource name.
sbb-itb-f9e5962
Optimizing Multi-Tenant Kubernetes Clusters
The next step in managing your Kubernetes cluster is improving its efficiency. On average, clusters utilize only about 10% of CPU and 23% of memory. In a multi-tenant setup, this inefficiency compounds across all tenant namespaces. Optimizing such environments focuses on three key areas: autoscaling to align resources with demand, topology spread to distribute workloads evenly, and cost control to minimize expenses from unused infrastructure.
Autoscaling for Tenant-Specific Workloads
Autoscaling dynamically adjusts resources based on actual workload demands, building on Kubernetes’ advanced scheduling capabilities. Two primary tools handle this: the Horizontal Pod Autoscaler (HPA) and the Vertical Pod Autoscaler (VPA).
- HPA modifies the number of pod replicas and operates using the
autoscaling/v2API, scaling pods based on metrics like CPU, memory, or custom values (e.g., tenant-specific request rates). - VPA, stable since Kubernetes v1.25, adjusts CPU and memory requests for existing pods. As of v1.35, in-place vertical scaling (resizing containers without restarting) is also stable.
For optimal results, use HPA to handle traffic spikes and VPA to fine-tune resource requests over time. However, avoid running both on the same metric to prevent conflicts. Instead, let VPA set baseline resource requests while HPA manages sudden load increases. When configuring HPA, remove the spec.replicas field from Deployment manifests to avoid replica count resets during updates. Set a 5-minute downscale stabilization window to prevent rapid fluctuations in pod counts, also known as "thrashing".
For tenant-specific scaling, KEDA (Kubernetes Event Driven Autoscaling) is a powerful tool. It scales workloads based on external events, such as queue sizes or scheduled peaks. Pair this with node autoscalers like Karpenter or Cluster Autoscaler:
- Karpenter provisions individual instances based on pending pod requirements without relying on pre-configured node groups.
- Cluster Autoscaler manages virtual machine groups, scaling nodes up or down depending on workload needs.
Once dynamic scaling is in place, the next focus should be on evenly distributing workloads to prevent performance bottlenecks.
Topology Spread Constraints for Load Balancing
Topology spread constraints ensure tenant workloads are distributed evenly across failure domains like nodes, zones, or racks. This helps avoid bottlenecks and enhances availability. For example, if all replicas of a tenant’s service are on a single node, a failure could bring the entire service down. By setting a maxSkew value (e.g., 1 for strict balance), you can limit the maximum imbalance between domains – ideal for high-availability workloads.
To achieve balanced distribution:
- Apply constraints across zones and nodes using labels like
topology.kubernetes.io/zoneandkubernetes.io/hostname. - Set
nodeAffinityPolicyandnodeTaintsPolicytoHonor(introduced in Kubernetes v1.33) to ensure only eligible nodes are considered in skew calculations. - Use the
matchLabelKeysfield (Beta in v1.27+) during rolling updates to calculate skew based on the current deployment revision, avoiding imbalances caused by lingering older replicas.
For non-critical workloads, the whenUnsatisfiable: ScheduleAnyway option allows pods to be scheduled even if spread constraints aren’t fully met, preventing them from getting stuck in a "Pending" state in resource-constrained clusters. To maintain balance during scale-down operations, use the Descheduler to redistribute pods after a tenant reduces their deployment size.
While balancing workloads is essential, addressing idle capacity can further reduce costs.
Cost Optimization Strategies
Managing costs is crucial for sustainable multi-tenant operations. Idle nodes can quickly drive up expenses in these environments. Node consolidation is an effective strategy – this process removes underutilized nodes and reschedules pods onto fewer, more efficient instances. Enable this feature in your node autoscaler to shrink the cluster during off-peak hours. For fault-tolerant workloads, consider using spot instances, which can be 70-90% cheaper than on-demand instances. Keep in mind, though, that spot instances can be reclaimed with minimal notice.
To ensure fair resource usage among tenants:
- Use ResourceQuotas to cap the resources a single tenant can consume.
- Define a LimitRange for each tenant namespace to automatically set resource requests and limits for containers, preventing unbounded usage.
For deployments with 20+ replicas, rely on topology spread constraints instead of pod anti-affinity. Anti-affinity is binary and can block scheduling entirely, while spread constraints allow for more flexible distribution ratios.
| Strategy | Component | Primary Benefit |
|---|---|---|
| Horizontal Scaling | HPA / KEDA | Aligns replica count with traffic/events |
| Vertical Scaling | VPA | Optimizes resource requests |
| Node Scaling | Karpenter / Cluster Autoscaler | Reduces idle node costs |
| Resource Guardrails | ResourceQuotas / LimitRanges | Prevents resource monopolization |
| Workload Distribution | Topology Spread Constraints | Balances workloads across zones/nodes |
For workloads requiring higher isolation, consider sandboxing tenant pods with virtual machines or userspace kernels. While this approach adds complexity and overhead, it provides a security boundary similar to traditional multi-tenant infrastructures.
Conclusion and Key Takeaways
Let’s wrap up with a quick look at the practical strategies and benefits of multi-tenant resource scheduling. This approach doesn’t just streamline operations – it can slash costs by 30–40% and boost resource utilization from 30–35% to over 70%. For smaller teams, it also simplifies management by consolidating clusters into one shared environment.
Steps to Implement Multi-Tenant Resource Scheduling
To get started, partition workloads using Namespaces. Apply a "deny-all" Network Policy and then allow only the necessary traffic. Configure RBAC (Role-Based Access Control) with roles tailored to specific needs – like Admin, Developer, or Viewer – and enforce ResourceQuotas and LimitRanges for each namespace (refer to the RBAC and Resource Quotas sections for detailed steps).
For workload isolation, leverage tools like Pod Priority, Preemption, Node Affinity, and Taints and Tolerations. These are especially useful for reserving high-value resources, such as GPUs (see the advanced techniques section for more). To enhance security, enforce Pod Security Standards – like restricted or baseline profiles – to block privileged container execution. Automate configuration checks with policy engines such as Kyverno or OPA/Gatekeeper.
If you need even stronger isolation, consider sandboxed runtimes like gVisor or Kata Containers for running untrusted code. Alternatively, tools like vCluster can provide tenants with isolated control planes while still sharing the underlying infrastructure.
How Multi-Tenancy Supports Scaling Goals
Multi-tenant resource scheduling is a game-changer for scaling. It eliminates the need for deep infrastructure expertise, making it easier for teams to scale operations quickly. As Geri Máté from DEV Community points out:
"Running multiple applications on separate clusters is a resource nightmare".
By consolidating workloads into a single shared cluster, small DevOps teams can spend less time managing infrastructure and more time on product development. Namespace-based isolation ensures minimal overhead and allows for instant provisioning through automated namespace creation.
This approach is especially advantageous for AI startups running untrusted scripts or SaaS platforms offering tiered services. For instance, Pod Priority can help differentiate between "freemium" and "premium" customers, ensuring premium users get guaranteed resources during peak demand. Additionally, cost-monitoring tools like Kubecost can track resource usage by namespace, making it easier to implement fair billing or internal chargebacks. As Kubernetes documentation puts it:
"Sharing clusters saves costs and simplifies administration".
FAQs
How does multi-tenancy enhance resource efficiency in Kubernetes?
Multi-tenancy in Kubernetes enables multiple users, teams, or applications to share a single cluster infrastructure. This setup helps make the most of resources, cutting down on idle capacity and keeping costs in check. By running workloads together, organizations can handle resources more efficiently while still ensuring each tenant stays secure and isolated.
On top of that, multi-tenancy streamlines cluster management. It centralizes operations, making it easier to scale up or down and adjust resources dynamically as needed. This approach keeps infrastructure use balanced and cost-efficient without sacrificing performance or security.
What’s the difference between soft and hard multi-tenancy in Kubernetes?
Soft multi-tenancy relies on Kubernetes tools like namespaces, RBAC (Role-Based Access Control), and network policies to create logical separation between tenants. While this method provides a basic level of isolation, it assumes tenants have a certain degree of trust in one another and does not enforce rigid security boundaries.
Hard multi-tenancy, however, takes isolation to the next level by incorporating stricter security measures. These include secure runtimes, tighter policy enforcement, and automated safeguards. This approach ensures tenants remain fully isolated and protected, even in environments where trust between tenants cannot be guaranteed.
How do custom schedulers improve resource allocation in multi-tenant Kubernetes environments?
Custom schedulers play a key role in improving resource allocation within multi-tenant Kubernetes environments. By enabling customized scheduling policies, they cater to the specific requirements of different tenants or workloads. Unlike Kubernetes’ default scheduler, custom schedulers allow for advanced algorithms and rules that can prioritize resource demands, balance workloads, or ensure fair resource distribution. This leads to a more efficient use of resources and improved performance across various workloads.
These schedulers also support advanced policies like gang scheduling, NUMA-awareness, and load-aware placement. Such capabilities are crucial for optimizing resource usage while maintaining tenant isolation. Additionally, they address challenges like noisy neighbors by enforcing strict resource and placement policies, ensuring fair resource sharing and bolstering security. With these features, custom schedulers are an essential tool for effectively managing multi-tenant Kubernetes clusters.